
If you love delicate, buttery treats with a rich, nutty twist, this Brown Butter Madeleines Recipe is going to become your new favorite. These little French sponge cakes capture the perfect balance of tender crumb and a crisp exterior, elevated by the toasty, caramelized flavor of brown butter. Whether you’re serving them with a cup of tea or gifting them to friends, these madeleines feel fancy but are surprisingly simple to master in your own kitchen.
Ingredients You’ll Need
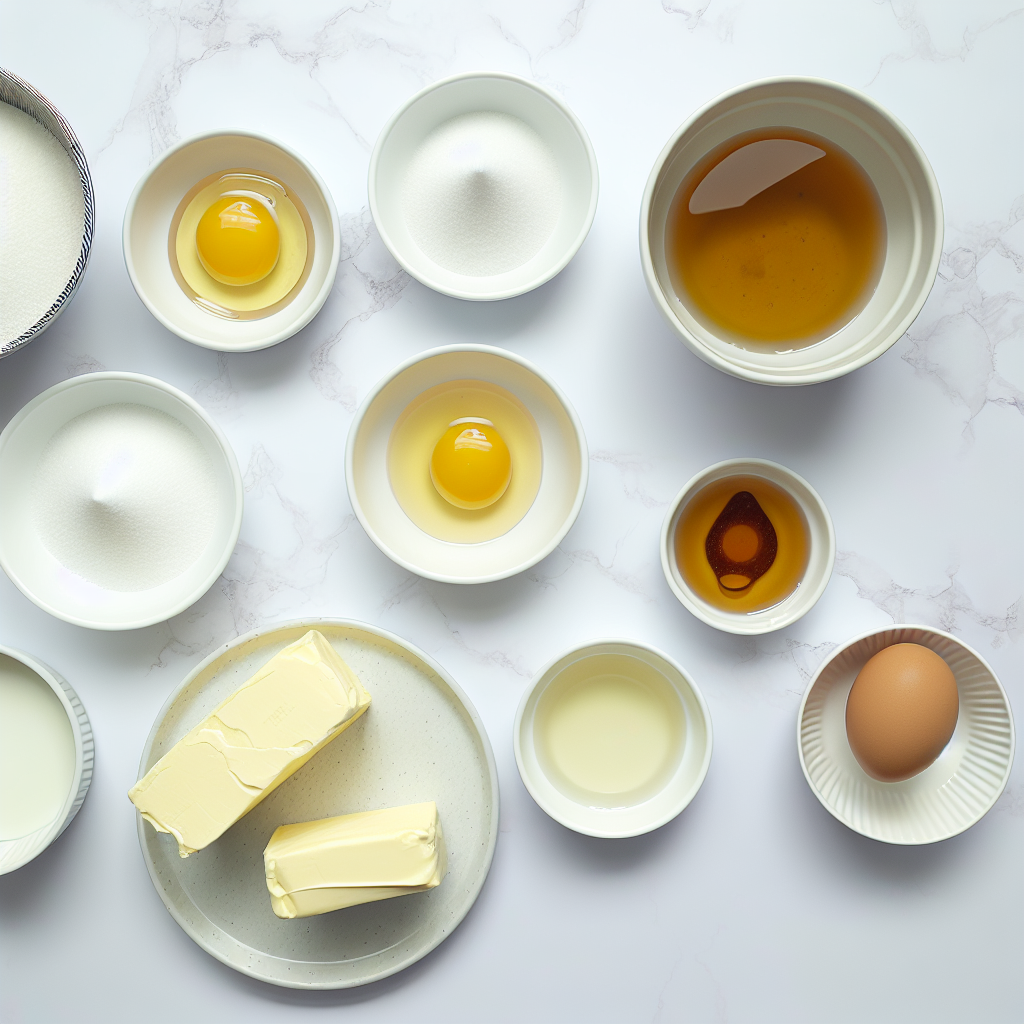
The magic of this Brown Butter Madeleines Recipe is in its simplicity. Each ingredient plays a crucial role, from creating the perfect light texture to developing that signature flavor and golden color. You’ll find that with just a few pantry staples, you can whip up these irresistible treats anytime.
- 100g salted butter (plus extra to grease the tin): The star for browning and adding a nutty richness that defines this recipe.
- 1 large egg: Provides structure and helps bind the batter together.
- 1 egg yolk: Adds extra richness and tenderness to the crumb.
- 60g caster sugar: Sweetens the madeleines while contributing to their light texture.
- 1 tbsp honey: Enhances flavor complexity with subtle floral sweetness.
- 1 tsp vanilla extract: Infuses the batter with warm, aromatic notes.
- 100g plain flour: The base that gives madeleines their delicate crumb.
- 2 tbsp milk or buttermilk: Adds moisture and makes the madeleines tender.
- 1 tsp baking powder: Helps the madeleines rise into their iconic puffed shape.
How to Make Brown Butter Madeleines Recipe
Step 1: Grease Your Tin
Before you begin mixing, generously butter your madeleine tin. This crucial step prevents sticking and ensures your perfectly shaped cakes release beautifully after baking.
Step 2: Brown the Butter
Place the salted butter in a small saucepan over medium heat. Let it melt and then keep it gently bubbling. Watch closely as it shifts to a lovely golden brown shade and fills your kitchen with an irresistible nutty aroma. Once browned, remove it from the heat and let it cool slightly. This transformation is the secret that elevates this Brown Butter Madeleines Recipe to the next level.
Step 3: Whisk the Wet Ingredients
In a large bowl, vigorously whisk the egg, egg yolk, caster sugar, honey, and vanilla extract for 2 to 3 minutes. You want the mixture to be pale, slightly airy, and well combined. If you have an electric whisk, this is the moment to use it; it makes the process much easier, but a hand whisk will do just fine.
Step 4: Combine the Dry and Wet Ingredients
Add the flour, milk (or buttermilk), and baking powder to your whisked eggs. Pour in the browned butter, and gently whisk everything together until just combined. The batter should be thick and smooth, so avoid overmixing to keep your madeleines delightfully tender.
Step 5: Chill the Batter
Cover your bowl with clingfilm or a tea towel and pop it into the fridge for at least 30 minutes. If time allows, chilling overnight deepens the flavors and improves texture—a simple step that makes this Brown Butter Madeleines Recipe even better.
Step 6: Preheat the Oven
While the batter chills, preheat your oven to 220°C (200°C fan) or 400°F (gas mark 6). This high initial heat jumpstarts the madeleines’ rise and helps create their signature crisp edges.
Step 7: Fill the Tin
After chilling, spoon your batter evenly into each cavity of the buttered madeleine tin. No need to spread it flat—big dollops work perfectly. This recipe makes about 12 madeleines, so space them out nicely.
Step 8: Bake to Perfection
Place the tin in the oven and immediately reduce the temperature to 180°C (160°C fan) or 350°F (gas mark 4). Bake for 10-14 minutes until golden brown and risen, sporting that iconic nipple-like peak in the center that tells you they’re ready.
Step 9: Cool and Enjoy
Remove the madeleines from the oven and carefully pop them out of the tin onto a wire rack. Let them cool completely to maintain that perfect texture. Now, get ready to savor every buttery, nutty bite.
How to Serve Brown Butter Madeleines Recipe
Garnishes
Enhance your Brown Butter Madeleines Recipe with a dusting of icing sugar or a light drizzle of melted dark chocolate. Fresh berries or a sprinkle of toasted nuts add a lovely contrast in texture and flavor.
Side Dishes
Serve these delicate treats alongside a steaming cup of tea, a freshly brewed espresso, or even a glass of cold milk. Their subtle sweetness pairs beautifully with both warm and cold beverages, making them a versatile companion for any occasion.
Creative Ways to Present
Arrange madeleines on a pretty platter with edible flowers for a charming afternoon tea display. Or try sandwiching a bit of lemon curd or raspberry jam between two madeleines for a playful and delicious twist on traditional cookies.
Make Ahead and Storage
Storing Leftovers
Keep leftover madeleines in an airtight container at room temperature for up to 2 days. This helps maintain their tender crumb and prevents them from drying out.
Freezing
If you want to save some for later, you can freeze madeleines by wrapping them individually in plastic wrap, then placing them in a freezer-safe bag. They’ll last up to 1 month this way without losing their lovely texture and flavor.
Reheating
To enjoy frozen madeleines, thaw them at room temperature and warm briefly in a low oven (about 150°C or 300°F) for 5 minutes. This refreshes their crisp edges and revives the nutty aroma of the browned butter.
FAQs
What makes brown butter different from regular butter?
Brown butter is simply butter melted and cooked until the milk solids turn golden brown, imparting a deep, nutty flavor and rich aroma that regular melted butter lacks. This flavor really shines in madeleines.
Can I substitute honey with another sweetener?
Absolutely! Maple syrup or light corn syrup can work as alternatives, though honey adds a unique floral note that complements the brown butter beautifully.
Is it okay to use salted butter in this recipe?
Yes, salted butter is recommended here as it adds a slight savory balance to the sweetness, enhancing the overall flavor complexity of your madeleines.
Why do I need to chill the batter?
Chilling allows the flour to fully hydrate and the fats to solidify, resulting in a better rise, improved texture, and more pronounced flavors in the final madeleines.
Can I make this recipe gluten-free?
With some experimentation, yes. Substitute the plain flour for a 1-to-1 gluten-free baking flour blend, but note that texture might vary slightly due to the absence of gluten’s elasticity.
Final Thoughts
Taking the time to make this Brown Butter Madeleines Recipe is truly rewarding. From the captivating aroma that fills your kitchen as the butter browns to that perfect delicate bite, these little cakes are a testament to how simple ingredients and a touch of care can create something extraordinary. Treat yourself and those you love—you won’t regret it!
Print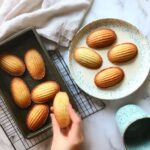
Brown Butter Madeleines Recipe
- Prep Time: 15 minutes
- Cook Time: 12 minutes
- Total Time: 27 minutes
- Yield: 12 madeleines
- Category: Dessert
- Method: Baking
- Cuisine: French
Description
This recipe for Brown Butter Madeleines features classic French butter cakes with a nutty twist. The butter is browned to develop a rich, toasted flavor that elevates these delicate shell-shaped cakes. Lightly sweetened with honey and vanilla, these madeleines have a tender crumb and a characteristic peaked top, perfect for teatime or dessert.
Ingredients
Brown Butter
- 100g (6 ½ tbsp) salted butter (plus extra to grease the tin)
Wet Ingredients
- 1 large egg
- 1 egg yolk
- 1 tbsp honey
- 1 tsp vanilla extract
- 2 tbsp milk or buttermilk
Dry Ingredients
- 60g (scant ⅓ cup) caster sugar
- 100g (rounded ½ cup) plain flour
- 1 tsp baking powder
Instructions
- Prepare the Tin: Grease your madeleine tin generously with butter to prevent sticking during baking.
- Brown the Butter: Melt the 100g salted butter in a small saucepan or frying pan over medium heat. Continue heating until it turns a toasted brown color and emits a nutty aroma. Remove from heat and let cool slightly.
- Mix Wet Ingredients: In a large bowl, whisk together the egg, egg yolk, caster sugar, honey, and vanilla extract for 2-3 minutes until the mixture is well combined and slightly airy.
- Combine Dry and Wet: Add the flour, milk or buttermilk, baking powder, and the cooled browned butter to the bowl. Gently whisk just until everything is combined into a thick batter, taking care not to overmix.
- Chill the Batter: Cover the bowl with a tea towel or clingfilm and refrigerate for 30 minutes to allow the batter to firm up and flavors to meld. For improved flavor and texture, chill overnight if desired.
- Preheat Oven: Preheat your oven to 220°C (200°C fan) / 400°F / gas mark 6.
- Fill Tin: Spoon the chilled batter evenly into the prepared madeleine tin cavities. There’s no need to spread; large dollops are perfect. The batter quantity will yield 12 madeleines.
- Bake: Place the tin in the oven, immediately reducing the temperature to 180°C (160°C fan) / 350°F / gas mark 4. Bake for 10-14 minutes until golden brown and well risen with a characteristic peaked center.
- Cool: Remove the tin from the oven and promptly unmold the madeleines onto a wire rack to cool completely.
- Serve: Enjoy your brown butter madeleines as a delightful teatime treat or dessert.
Notes
- Chilling the batter overnight enhances the flavor and texture of the madeleines.
- Use salted butter for a balance of flavors, but unsalted can be used if preferred; adjust salt accordingly.
- Be careful not to overmix the batter once flour is added to keep madeleines tender.
- Dust with powdered sugar or dip in melted chocolate for variation.
- If you don’t have buttermilk, regular milk is a fine substitute.


