
If you have been searching for a fresh, flavorful way to enjoy sushi at home, you are about to fall in love with this Oven-Baked Salmon Sushi Bites Recipe. It brings together the delicate creaminess of salmon, perfectly seasoned sushi rice, and vibrant garnishes, all baked to perfection for an irresistible dish. These bites are a celebration of textures and tastes that come together effortlessly for a fun and elegant appetizer or a crowd-pleasing party snack. Dive in and discover how simple ingredients can create such an extraordinary sushi experience!
Ingredients You’ll Need
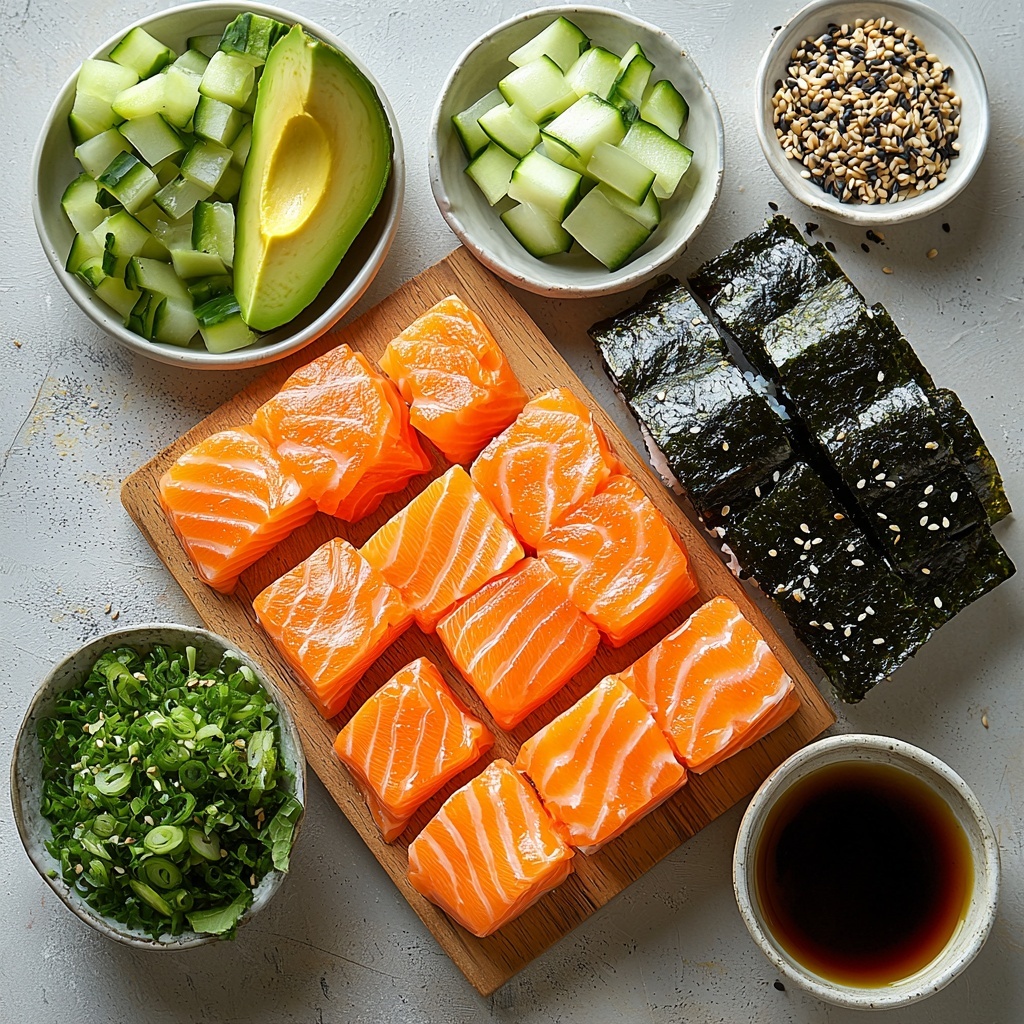
Every ingredient in this Oven-Baked Salmon Sushi Bites Recipe plays a crucial role — from the sticky sushi rice that forms the base to the fresh salmon that adds rich flavor. Together, they create a harmony of textures and colors that make this dish special and inviting.
- Sushi rice: The sticky texture is essential for holding the bites together without falling apart.
- Water: Used to cook the rice tenderly and evenly.
- Rice vinegar: Adds a subtle tang to the rice, giving it that iconic sushi flavor.
- Sugar: Balances the acidity of the vinegar with a gentle sweetness.
- Salt: Enhances all the flavors in the rice.
- Fresh salmon fillet: The star protein offering buttery texture and rich umami.
- Soy sauce: Marinating the salmon in this adds savory depth.
- Sesame oil: Brings a toasty aroma and nutty flavor to the salmon.
- Avocado: Soft and creamy, it complements the salmon perfectly.
- Cucumber: Adds crunch and a refreshing contrast.
- Nori sheets: Optional, but offer an extra seaweed flavor and great texture.
- Sesame seeds: For garnish, adding subtle nuttiness and visual appeal.
- Green onions: Freshly chopped for color and a mild onion bite.
- Wasabi and pickled ginger: Optional accompaniments to bring authentic sushi flavors.
How to Make Oven-Baked Salmon Sushi Bites Recipe
Step 1: Preheat the Oven
Before you begin, set your oven to 400 degrees Fahrenheit (200 degrees Celsius). Getting the oven hot while you prepare the ingredients ensures the salmon bakes perfectly without drying out.
Step 2: Cook the Sushi Rice
Rinse the sushi rice thoroughly under cold water until it runs clear to remove excess starch. Whether you have a rice cooker or prefer stovetop, cook the rice with 2 ½ cups water according to instructions. This step is vital to achieve that perfect sticky texture that supports the sushi bites.
Step 3: Season the Rice
Once the rice is cooked, transfer it to a large bowl. In a separate small bowl, mix rice vinegar, sugar, and salt until dissolved, then gently fold this seasoning mixture into the rice. Let the rice cool slightly to room temperature — this makes it easier to handle when forming the bites.
Step 4: Marinate the Salmon
Cut the fresh salmon fillet into bite-sized cubes. Marinate the cubes in a blend of soy sauce and sesame oil for about 10 minutes, which infuses the delicate fish with savory, nutty flavors.
Step 5: Assemble the Sushi Bites
Line a baking sheet with parchment paper for easy cleanup. Using your hands, shape the sushi rice into small patties or rectangles and place them spaced apart on the baking sheet. Press gently so they hold their shape nicely without being too compressed.
Step 6: Add Salmon and Optional Toppings
Top each rice patty with a cube of the marinated salmon. For an extra burst of creaminess and crunch, add a slice of avocado or a few julienned cucumber strips atop the salmon. If you like, a thin strip of nori can go underneath for a classic sushi flair.
Step 7: Bake to Perfection
Place the assembled bites in the preheated oven and bake for 15 to 20 minutes. Watch for the salmon to turn opaque and slightly crisp around the edges — this is when your sushi bites are ready for their final touches.
Step 8: Garnish and Serve
Remove the bites from the oven and sprinkle with sesame seeds and chopped green onions for a burst of color and flavor. Let them cool a bit before serving for the best texture and taste.
How to Serve Oven-Baked Salmon Sushi Bites Recipe
Garnishes
A sprinkle of toasted sesame seeds and fresh green onion elevates the visual appeal and adds layers of flavor. For those who adore a spicy kick, a touch of wasabi or a side of pickled ginger delivers that authentic sushi experience.
Side Dishes
These sushi bites pair beautifully with light sides such as a crisp seaweed salad, miso soup, or even a refreshing cucumber salad. The goal is to complement the rich salmon without overpowering the delicate flavors.
Creative Ways to Present
For a fun presentation, serve the sushi bites on a wooden platter lined with shiso leaves or alongside small dipping bowls for soy sauce. You can also skewer a few bites for a stylish finger-food option at your next gathering.
Make Ahead and Storage
Storing Leftovers
If you happen to have leftovers, store them in an airtight container in the refrigerator for up to two days. The textures are best enjoyed fresh, but refrigeration helps keep the flavors intact.
Freezing
Freezing is not recommended for these sushi bites as the texture of the rice and avocado can deteriorate when thawed, leading to sogginess and loss of quality.
Reheating
To reheat, place the bites in a preheated oven at 300 degrees Fahrenheit for about 5 to 7 minutes, just enough to warm the salmon without drying it out. Avoid microwaving, which can make the rice tough.
FAQs
Can I use frozen salmon for this recipe?
Fresh salmon is ideal for this Oven-Baked Salmon Sushi Bites Recipe as it offers the best texture and flavor. However, if you use frozen salmon, make sure it is fully thawed and patted dry before marinating.
Is it necessary to bake the salmon?
Baking cooks the salmon gently while maintaining a slightly crispy edge, which pairs nicely with the soft rice. If you prefer, you could use sashimi-grade raw salmon, but baking adds a comforting warmth and safety assurance.
Can I make these vegetarian?
Absolutely! Replace the salmon with marinated tofu cubes or grilled vegetables like bell peppers and mushrooms for a delicious vegetarian take on this recipe.
What if I don’t have sushi rice? Can I use regular rice?
Sushi rice’s sticky nature is key to helping the bites hold together. While short-grain rice is best, you can try a medium-grain rice as a substitute, though the bites may be a bit looser in texture.
How long can I serve these after baking?
Oven-Baked Salmon Sushi Bites are best enjoyed within a few hours of baking to experience the optimal flavor and texture. If left at room temperature for longer than two hours, they should be discarded for safety reasons.
Final Thoughts
This Oven-Baked Salmon Sushi Bites Recipe is a true delight that brings sushi into your kitchen with warmth, ease, and excitement. Whether for a cozy meal or impressing friends, these bites showcase how simple ingredients can come together for something uniquely delicious. Give it a try—you might find yourself making it again and again!
Print
Oven-Baked Salmon Sushi Bites Recipe
- Prep Time: 20 minutes
- Cook Time: 20 minutes
- Total Time: 40 minutes
- Yield: About 12-15 sushi bites
- Category: Appetizer
- Method: Baking
- Cuisine: Japanese Fusion
Description
Oven-Baked Salmon Sushi Bites are a delightful fusion dish that combines the delicate flavors of sushi rice, fresh salmon, and vibrant toppings into easy-to-make bite-sized treats. This recipe features perfectly seasoned sushi rice topped with marinated salmon cubes, baked to perfection for a slightly crispy texture, and garnished with sesame seeds and green onions. Served with optional avocado, cucumber, wasabi, and pickled ginger, these sushi bites offer a gourmet experience with simple preparation.
Ingredients
Sushi Rice
- 2 cups sushi rice
- 2 ½ cups water
- 1 tablespoon rice vinegar
- 1 tablespoon sugar
- ½ teaspoon salt
Salmon Topping
- 1 pound fresh salmon fillet, skin removed
- 1 tablespoon soy sauce
- 1 teaspoon sesame oil
Additional Toppings and Garnish
- 1 avocado, sliced
- 1 cucumber, julienned
- Nori sheets, cut into strips (optional)
- Sesame seeds, for garnish
- Green onions, chopped, for garnish
- Wasabi and pickled ginger, for serving (optional)
Instructions
- Preheat the Oven: Set your oven to 400°F (200°C) to prepare it for baking the sushi bites later.
- Cook the Sushi Rice: Rinse the sushi rice under cold water until the water runs clear to remove excess starch. Combine the rice and water in a rice cooker and cook as per the manufacturer’s instructions, or cook on the stovetop according to package directions.
- Season the Rice: Transfer the cooked rice to a large bowl. In a small bowl, mix rice vinegar, sugar, and salt until dissolved. Gently fold this seasoning mixture into the rice to evenly flavor it. Allow the rice to cool slightly.
- Prepare the Salmon: Cut the salmon fillet into small, bite-sized cubes. Marinate these cubes in soy sauce and sesame oil for about 10 minutes to infuse flavor.
- Assemble the Sushi Bites: Line a baking sheet with parchment paper. Using clean hands, form small patties or rectangles with the seasoned sushi rice and place them evenly spaced on the baking sheet. Gently press to help them hold their shape.
- Top with Salmon and Additional Toppings: Place one marinated salmon cube atop each rice patty. Optionally, add a slice of avocado or a few julienned cucumber strips on top for extra flavor and texture.
- Bake the Sushi Bites: Place the baking sheet in the preheated oven and bake for 15-20 minutes, or until the salmon is cooked through and edges become slightly crispy.
- Garnish: Remove the sushi bites from the oven and sprinkle sesame seeds and chopped green onions over them to enhance both taste and presentation.
- Serve: Allow the sushi bites to cool slightly before serving. Offer wasabi and pickled ginger on the side for an authentic sushi experience.
Notes
- For best results, use fresh sushi-grade salmon to ensure safety and optimal flavor.
- If you don’t have a rice cooker, cooking sushi rice on the stovetop with careful attention to water ratio and cooking time works well.
- You can omit avocado or cucumber if you prefer a simpler bite or have dietary restrictions.
- Marinating the salmon too long may overly soften the texture; stick to recommended marinating time.
- Use parchment paper to prevent sticking and make cleanup easier.
- Adjust baking time slightly if your salmon pieces are larger or smaller to avoid overcooking or undercooking.
- Leftover sushi bites can be refrigerated and consumed within 1-2 days for best freshness.


