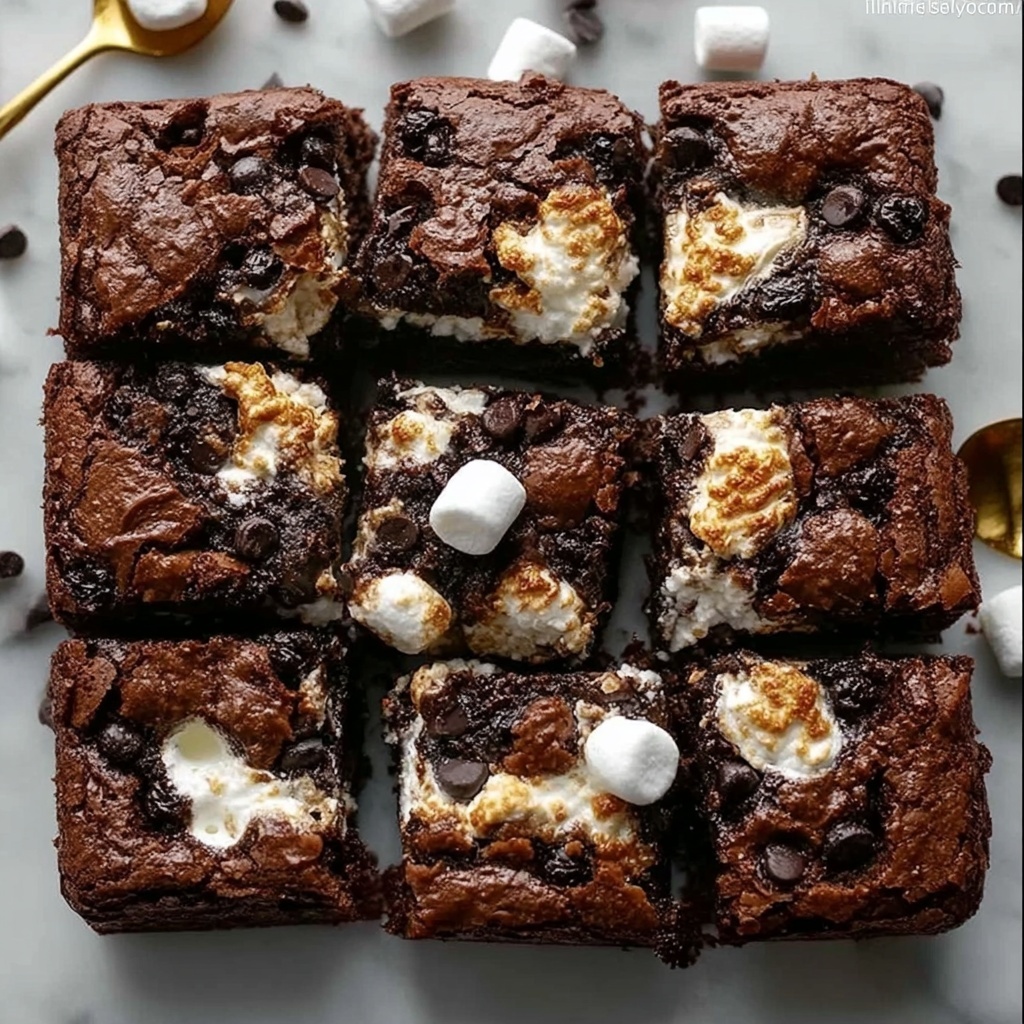
If you’re craving something that perfectly marries the gooey sweetness of marshmallow fluff and the rich, nutty creaminess of peanut butter with a fudgy chocolate base, you have to dive into this Fluffernutter Brownies Recipe. These brownies are a delightful twist on classic chocolate brownies, filled with layers of fluffy and nutty swirls that create a texture and flavor combo that’s simply irresistible. Whether you’re baking for a crowd or just treating yourself, this recipe will quickly become one of your very favorites to make and share.
Ingredients You’ll Need
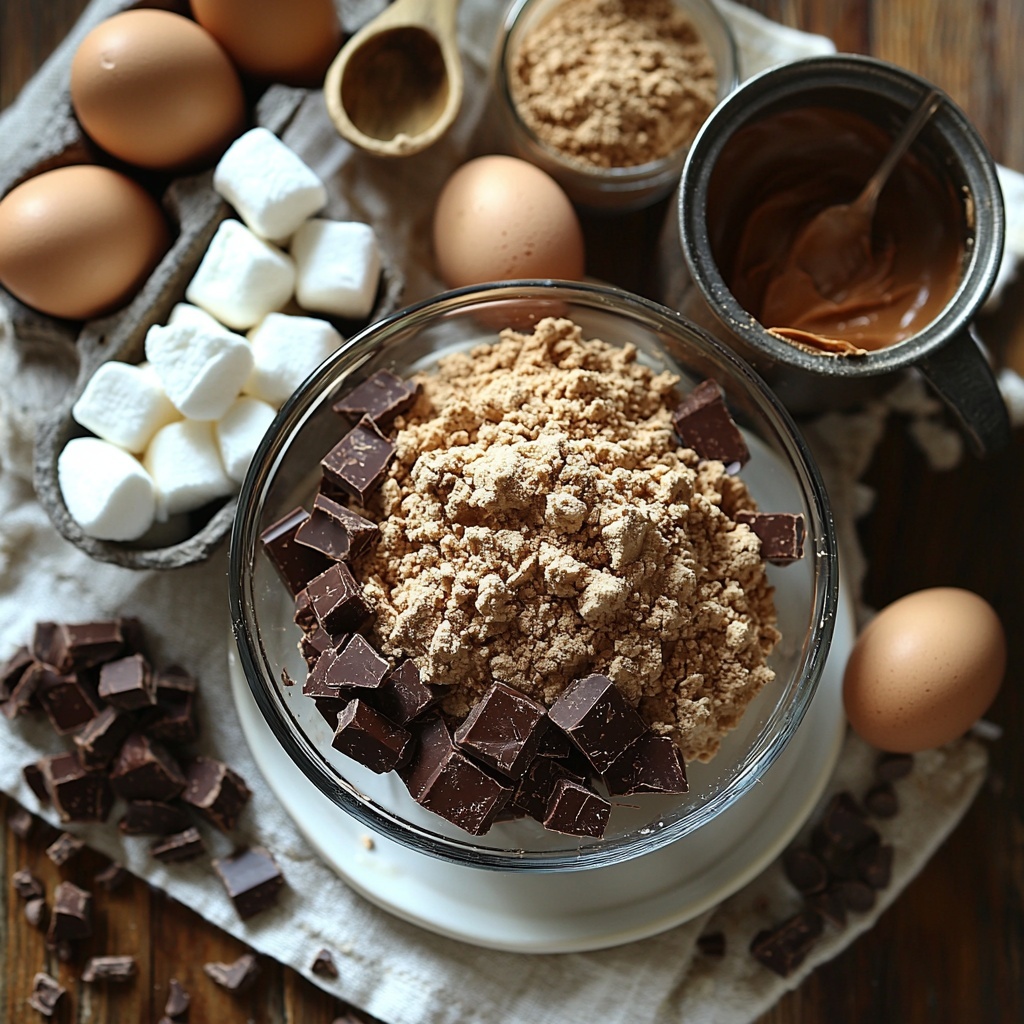
Gathering the right ingredients is the first joyful step toward making your Fluffernutter Brownies Recipe shine. Each component is chosen not just for flavor but for the way it affects texture, moisture, and that perfect fudgy consistency we all crave.
- Unsalted butter (1 cup): Melting this provides a rich, silky base and moisture for the brownies.
- Granulated sugar (1 cup): Adds sweetness and helps create a tender crumb.
- Brown sugar (1 cup): Brings a deep molasses flavor and extra chewiness.
- Large eggs (3): Gives structure and richness for perfectly set brownies.
- Vanilla extract (2 teaspoons): A subtle flavor enhancer that rounds out the chocolate and peanut butter.
- All-purpose flour (1 cup): The backbone for that classic brownie texture.
- Unsweetened cocoa powder (1 cup): Delivers intense chocolate flavor without extra fat.
- Salt (½ teaspoon): Balances sweetness and layers flavors beautifully.
- Marshmallow fluff (¾ cup): The star of the fluffernutter twist, adding pillowy, sweet pockets.
- Creamy peanut butter (¾ cup): For that nutty richness that pairs so well with chocolate.
- Chocolate chips or chunks (½ cup, optional): Adds bursts of melty chocolate in every bite, a welcome extra.
How to Make Fluffernutter Brownies Recipe
Step 1: Prep Your Pan and Oven
Start by preheating your oven to 350°F (175°C) and lining an 8×8-inch baking pan with parchment paper. This sets the stage so your brownies bake evenly and lift out easily when they’re ready to be devoured.
Step 2: Melt Butter and Mix Sugars
Gently melt the unsalted butter either on the stove or in the microwave, then let it cool just slightly so it doesn’t cook the eggs in the next step. Stir in both granulated and brown sugars until the mixture is smooth and glossy—this combo contributes a perfect balance of sweetness and moisture to your brownie base.
Step 3: Add Eggs and Vanilla
Whisk in your large eggs one at a time along with the vanilla extract. Mixing well at this point transforms the batter into a shiny, luscious mixture that promises fudgy goodness ahead.
Step 4: Incorporate Dry Ingredients
Sift together your unsweetened cocoa powder, all-purpose flour, and salt, then fold them gently into the wet mix. The key here is not to overmix—just combine until you no longer see dry flour streaks. This keeps your brownies tender instead of cakey.
Step 5: Layer the Batter with Fluff and Peanut Butter
Pour half the brownie batter evenly into your prepared pan. Drop spoonfuls of creamy peanut butter and marshmallow fluff on top. Use a knife or skewer to gently swirl these tasty dollops into the batter, creating that signature marbled effect everyone will swoon over.
Step 6: Add Remaining Batter and Repeat
Pour the rest of your batter over the swirled layer and repeat with more peanut butter and fluff. This double-layer technique gives you maximum flavor and that incredible texture variation from gooey pockets to fudgy brownie.
Step 7: Bake to Perfection
Pop your pan into the oven and bake for 28 to 32 minutes. You want a toothpick inserted in the center to come out with a few moist crumbs—this means your brownies have just the right amount of gooeyness, not too dry, not too underbaked.
Step 8: Cool Before Slicing
Patience is a virtue here! Allow your brownies to cool completely before slicing so they set properly and the swirls keep their beautiful definition. This also makes them easier to cut and serve without any sticky mess.
How to Serve Fluffernutter Brownies Recipe
Garnishes
A light dusting of powdered sugar or a drizzle of melted chocolate on top can elevate these brownies, but they’re stunning just as they are. For a fun twist, sprinkle chopped peanuts or add mini marshmallows right before baking to amp up their fluffernutter charm.
Side Dishes
Pair these rich brownies with a scoop of vanilla ice cream or a dollop of whipped cream for a dreamy dessert experience. Fresh berries or a simple strawberry sauce also complement the peanut butter and marshmallow flavors beautifully, adding a fresh pop to each bite.
Creative Ways to Present
Try serving your Fluffernutter Brownies Recipe in small squares on a dessert platter for parties, or stack them with layers of peanut butter frosting and marshmallow fluff for a decadent brownie cake. Wrapping individual pieces in parchment and tying with ribbon makes adorable, thoughtful homemade gifts too!
Make Ahead and Storage
Storing Leftovers
Once cooled, store your brownies in an airtight container at room temperature for up to four days. This keeps them moist and chewy without drying out. If your kitchen is warm, refrigeration can help; just bring them back to room temperature before serving for the best texture.
Freezing
Fluffernutter Brownies freeze wonderfully! Wrap each brownie tightly in plastic wrap, then place in a freezer-safe container or bag. They’ll keep for up to three months, making this recipe a great option for prepping ahead or surprising friends with a sweet treat anytime.
Reheating
To enjoy your brownies warm, microwave a square for about 15 seconds or pop them in a low oven (around 300°F) for 5 to 10 minutes. This warms the peanut butter and fluff for that melty, luscious texture we all crave.
FAQs
Can I use crunchy peanut butter instead of creamy?
Absolutely! Crunchy peanut butter adds a fun texture contrast, but creamy tends to blend more smoothly with the marshmallow fluff for those signature swirls.
Is there a substitute for marshmallow fluff?
You can use mini marshmallows or homemade marshmallow cream if you prefer, but marshmallow fluff gives the best consistency and sweetness for this recipe.
Can I make these gluten-free?
Yes! Substitute the all-purpose flour with a gluten-free baking blend, and be sure your cocoa powder and other ingredients are also gluten-free certified for safe results.
Do I need to use parchment paper?
While not absolutely required, parchment paper makes removing the brownies from the pan much easier and helps with clean, perfect edges.
How thick should the brownie layer be before adding the fluff and peanut butter?
Pour about half the batter into your pan so that it forms an even, roughly one-inch thick layer. This gives enough room to layer the swirls without making the brownies too dense.
Final Thoughts
Once you try this Fluffernutter Brownies Recipe, I can promise it will become a go-to whenever you want to impress or simply indulge in something extraordinary. The balance of rich chocolate, sweet marshmallow fluff, and creamy peanut butter swirls is pure magic. So preheat your oven, gather your ingredients, and get ready to treat yourself like never before!
Print
Delicious Recipe
- Prep Time: 10 minutes
- Cook Time: 30 minutes
- Total Time: 40 minutes
- Yield: 16 servings
- Category: Dessert
- Method: Baking
- Cuisine: American
Description
Decadent Fluffernutter Brownies combine rich, fudgy chocolate brownies with swirls of creamy peanut butter and sweet marshmallow fluff, creating a delightful treat perfect for dessert or special occasions.
Ingredients
Brownie Base
- 1 cup unsalted butter
- 1 cup granulated sugar
- 1 cup brown sugar
- 3 large eggs
- 2 teaspoons vanilla extract
- 1 cup all-purpose flour
- 1 cup unsweetened cocoa powder
- 1/2 teaspoon salt
Swirl Toppings
- 3/4 cup marshmallow fluff
- 3/4 cup creamy peanut butter
- 1/2 cup chocolate chips or chunks (optional)
Instructions
- Preheat and prepare pan: Preheat your oven to 350°F (175°C) and line an 8×8-inch baking pan with parchment paper for easy removal of the brownies.
- Melt butter: Melt the unsalted butter in a saucepan or microwave-safe bowl and allow it to cool slightly before mixing.
- Mix sugars: Whisk in granulated sugar and brown sugar into the melted butter until the mixture is smooth and well combined.
- Add eggs and vanilla: Incorporate the eggs one at a time along with the vanilla extract, mixing until the batter turns glossy and slightly thickened.
- Add dry ingredients: Gently fold in the unsweetened cocoa powder, all-purpose flour, and salt just until combined, taking care not to overmix to keep the brownies tender.
- Layer batter and toppings: Pour half of the brownie batter into the prepared baking pan. Drop spoonfuls of creamy peanut butter and marshmallow fluff over the batter, then swirl gently with a knife or skewer to create a marbled effect.
- Add remaining batter and swirl: Pour the remaining brownie batter on top and optionally add more peanut butter and marshmallow fluff dollops to swirl again for a defined pattern.
- Bake: Bake in the preheated oven for 28–32 minutes or until a toothpick inserted in the center comes out with a few moist crumbs but not wet batter.
- Cool and serve: Allow the brownies to cool completely in the pan before slicing into 16 squares and serving.
Notes
- Use parchment paper to easily lift out the brownies for clean slicing.
- Do not overmix the batter to avoid tough brownies.
- Swirling the peanut butter and fluff creates a beautiful marbled effect and blends flavors.
- Chocolate chips are optional but add extra texture and richness.
- Store leftovers in an airtight container at room temperature for up to 3 days.
