
If you are searching for a delightful and versatile treat to impress friends and family, this Mini Quiches Recipe is an absolute must-try. These little bites combine a flaky, buttery crust with a creamy, savory filling packed with cheese, fresh vegetables, and optional ham for an irresistible taste experience. Perfect for breakfast, brunch, or a party appetizer, these mini quiches offer a perfect balance of flavors and textures that will have everyone coming back for more.
Ingredients You’ll Need
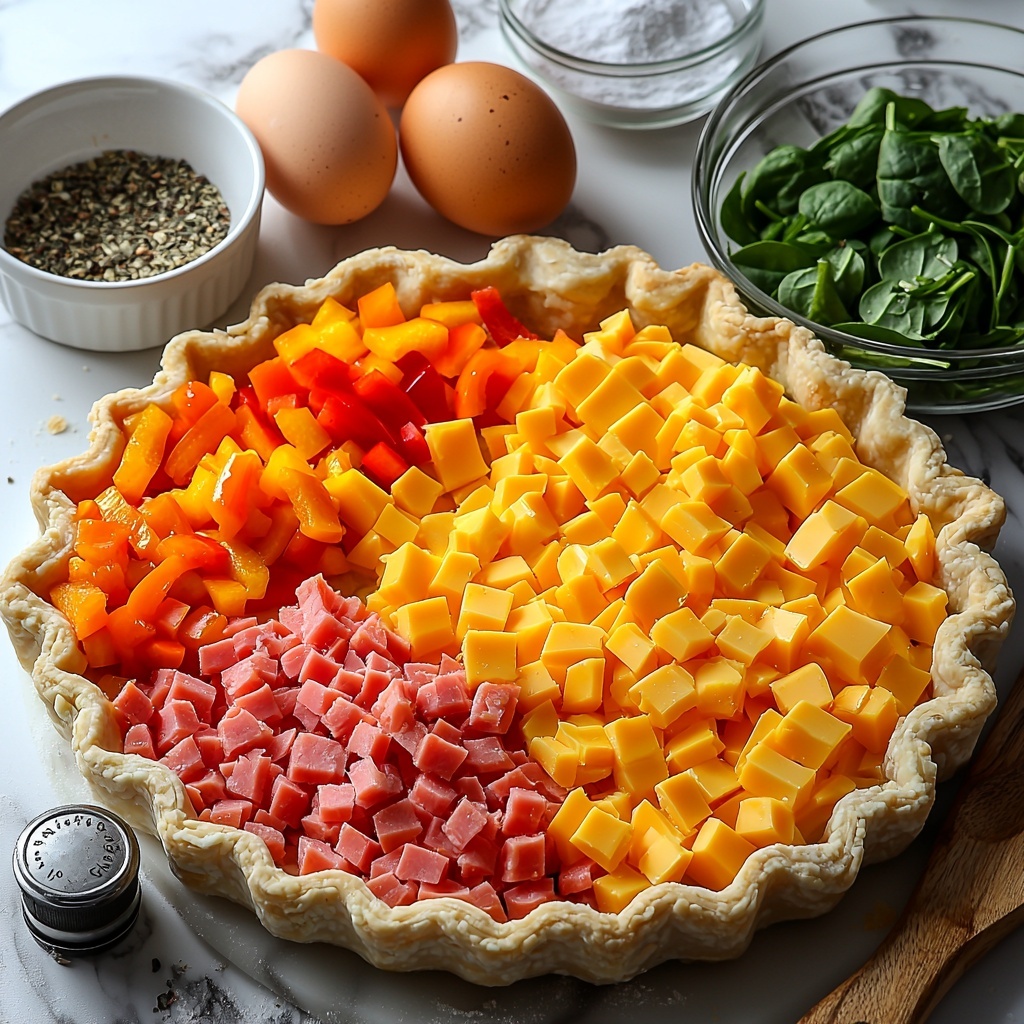
The beauty of this Mini Quiches Recipe lies in its simplicity and the way each ingredient plays a vital role. From the flaky pie crust that holds everything together, to the eggs and milk which create that creamy custard base, and the mix of veggies and cheese adding color and richness—every component counts.
- Pre-made pie crust (9-inch): Provides a buttery, flaky base that is easy to work with and delivers fantastic texture.
- 4 large eggs: The heart of the filling, binding ingredients into a luscious custard.
- 1 cup whole milk: Adds creaminess and lightness to the egg mixture.
- 1 cup shredded cheddar cheese: Brings sharp flavor and gooey meltiness.
- 1/2 cup chopped bell peppers: Offers a crunchy, sweet pop of color and freshness.
- 1/2 cup chopped spinach: Adds earthiness and vibrant green nutrition.
- 1/2 cup diced ham (optional): For those who love a bit of savory, meaty goodness.
- Salt and pepper to taste: Essential for enhancing and balancing all flavors.
- 1 teaspoon herbs de Provence: A fragrant mix that adds subtle, sophisticated herbal notes.
How to Make Mini Quiches Recipe
Step 1: Prepare Your Oven and Muffin Tin
Start by preheating your oven to 375 degrees Fahrenheit (190 Celsius). While the oven warms, grease a muffin tin to ensure your mini quiches will release easily once baked and maintain their perfect shape.
Step 2: Cut the Pie Crust
Roll out your pre-made pie crust gently, then use a round cutter slightly larger than your muffin cups to cut out circles. These will form the cozy crust cups that hold your delicious filling.
Step 3: Whisk the Egg Mixture
In a medium bowl, vigorously whisk together the eggs, whole milk, salt, pepper, and herbs de Provence until smooth and fully combined. This mixture is the creamy heart of your mini quiches.
Step 4: Add Cheese, Veggies, and Ham
Gently fold in the shredded cheddar, chopped bell peppers, spinach, and diced ham if you’re using it. This step ensures every bite bursts with flavor and pleasing textures.
Step 5: Fill the Muffin Cups
Place your cut pie crust rounds into the muffin tin cups and spoon the filling mixture into each, filling about three-quarters full to allow room for puffing as they bake.
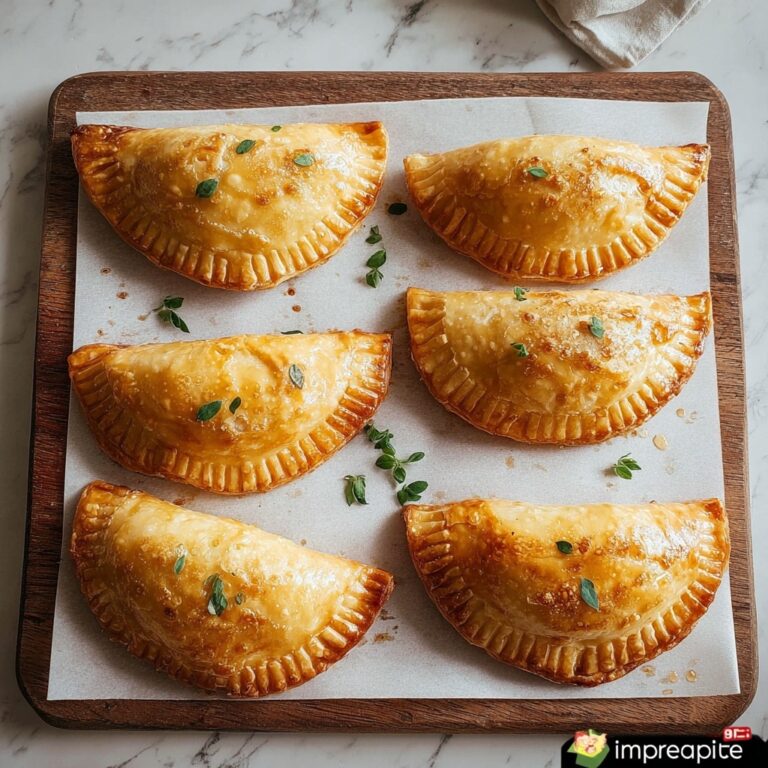
Step 6: Bake to Perfection
Bake for 20 to 25 minutes until the mini quiches are beautifully golden and puffed up. This baking time ensures a perfectly set filling with a lightly crisp crust.
How to Serve Mini Quiches Recipe
Garnishes
A sprinkle of freshly chopped parsley or a tiny dollop of sour cream elevates the presentation and adds a fresh flavor contrast that pairs wonderfully with the rich filling. You can also try a light dusting of paprika for a bit of color and spice.
Side Dishes
Serve these mini quiches alongside a crisp side salad, such as mixed greens with a light vinaigrette, or a fresh fruit medley to balance the savory richness. They also pair wonderfully with roasted potatoes or a simple soup for a more substantial meal.
Creative Ways to Present
For gatherings, arrange mini quiches on a decorative platter with fresh herbs around the edges and colorful veggies for a festive display. You can also serve them warm or at room temperature for easy buffet-style enjoyment.
Make Ahead and Storage
Storing Leftovers
Leftover mini quiches can be stored in an airtight container in the refrigerator for up to 3 days. This makes them an excellent option for quick lunches or snacking throughout the week.
Freezing
Mini quiches also freeze beautifully. Simply place cooled quiches on a baking sheet to freeze individually before transferring them to a freezer-safe bag or container. They’ll keep well for up to 2 months, perfect for future busy days.
Reheating
Reheat frozen or refrigerated mini quiches in a preheated oven at 350 degrees Fahrenheit (175 Celsius) for about 10 to 15 minutes, or until warmed through and crisp. Avoid microwaving if you want to preserve that delightful crust texture.
FAQs
Can I make mini quiches without the ham?
Absolutely! The ham is optional, and these mini quiches are just as tasty without it. You can easily make a vegetarian version by focusing on the veggies and cheese or even try mushrooms or sun-dried tomatoes for variety.
What pie crust works best for mini quiches?
Using a pre-made pie crust makes this recipe incredibly easy, but if you want to make your own, a classic flaky butter crust is ideal. It provides the perfect structure and buttery flavor that complements the filling beautifully.
Can I use other cheeses besides cheddar?
Definitely! Feel free to experiment with mozzarella, Swiss, or even goat cheese for different flavor profiles. Just make sure the cheese you choose melts well and pairs nicely with your chosen vegetables and herbs.
Are mini quiches suitable for meal prep?
Yes, mini quiches are excellent for meal prep. They store well in the fridge and freezer, making them convenient to enjoy any time without much fuss. They’re perfect for quick breakfasts or snacks on busy days.
How can I make mini quiches gluten-free?
To make this Mini Quiches Recipe gluten-free, substitute the pre-made pie crust with a gluten-free crust variety or try a crustless version by greasing the muffin tin and baking the filling directly. Just adjust baking times accordingly.
Final Thoughts
This Mini Quiches Recipe is one of those timeless, crowd-pleasing dishes that effortlessly combines ease of preparation with impressive results. Whether you’re serving them at a casual brunch or a special occasion, these little delights are bound to bring joy to your table. Give them a try and prepare to fall in love with every single bite!
Print
Mini Quiches Recipe
- Prep Time: 15 minutes
- Cook Time: 25 minutes
- Total Time: 40 minutes
- Yield: 12 mini quiches
- Category: Breakfast
- Method: Baking
- Cuisine: American
Description
Delightful and easy-to-make Mini Quiches featuring a flaky pie crust filled with a savory blend of eggs, cheddar cheese, bell peppers, spinach, and optional diced ham. These bite-sized quiches are perfect for breakfast, brunch, or snack time, baked until golden and fluffy.
Ingredients
Crust
- 1 pre-made pie crust (9-inch)
Filling
- 4 large eggs
- 1 cup whole milk
- 1 cup shredded cheddar cheese
- 1/2 cup chopped bell peppers
- 1/2 cup chopped spinach
- 1/2 cup diced ham (optional)
- Salt and pepper to taste
- 1 teaspoon herbs de Provence
Instructions
- Preheat and prepare muffin tin: Preheat your oven to 375°F (190°C) and grease a muffin tin well to prevent sticking.
- Cut pie crust rounds: Roll out the pre-made pie crust on a lightly floured surface. Using a round cutter or a glass, cut rounds large enough to fit snugly into the muffin cups.
- Make the egg mixture: In a medium bowl, whisk together the eggs, whole milk, salt, pepper, and herbs de Provence until the mixture is smooth and well combined.
- Add fillings: Fold in the shredded cheddar cheese, chopped bell peppers, chopped spinach, and diced ham if using. Mix gently to evenly distribute the ingredients throughout the egg mixture.
- Fill muffin cups: Place each pie crust round into the prepared muffin cups, pressing gently to form a crust base and sides. Spoon the filling mixture into each cup, filling about three-quarters full to allow space for puffing during baking.
- Bake mini quiches: Place the muffin tin in the preheated oven and bake for 20-25 minutes or until the mini quiches are golden brown on top and puffed up. A toothpick inserted should come out clean.
- Cool and serve: Allow the mini quiches to cool for a few minutes before carefully removing them from the muffin tin. Serve warm or at room temperature.
Notes
- You can customize the fillings by adding mushrooms, onions, or different types of cheese.
- For a lighter version, substitute the whole milk with low-fat milk or a milk alternative.
- These mini quiches can be made ahead and refrigerated for up to 2 days or frozen for longer storage.
- Use silicone muffin liners for easier removal and mess-free baking.
- If you prefer crustless quiches, simply grease the muffin tin and pour the filling directly in without the pie crust.


