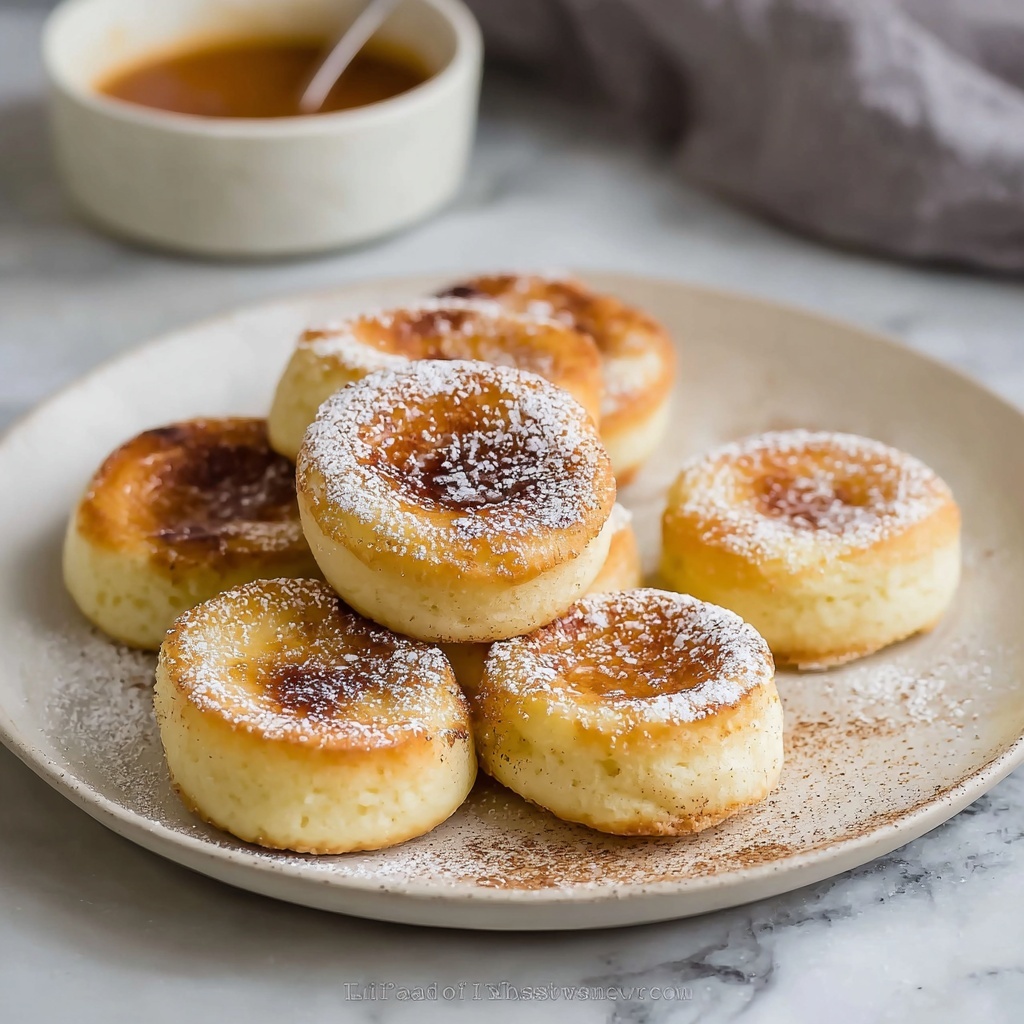
If you have a soft spot for uniquely delightful desserts, you are in for a treat with Kinako Mochi Waffles: An Amazing Ultimate Recipe. These waffles blend the chewy, tender texture of mochi with the nutty, toasty flavor of kinako (roasted soybean flour), creating a breakfast or snack experience that’s both comforting and unexpectedly delicious. Each bite offers a perfect balance of sweetness and subtle earthiness, making these waffles a standout that your taste buds will thank you for.
Ingredients You’ll Need
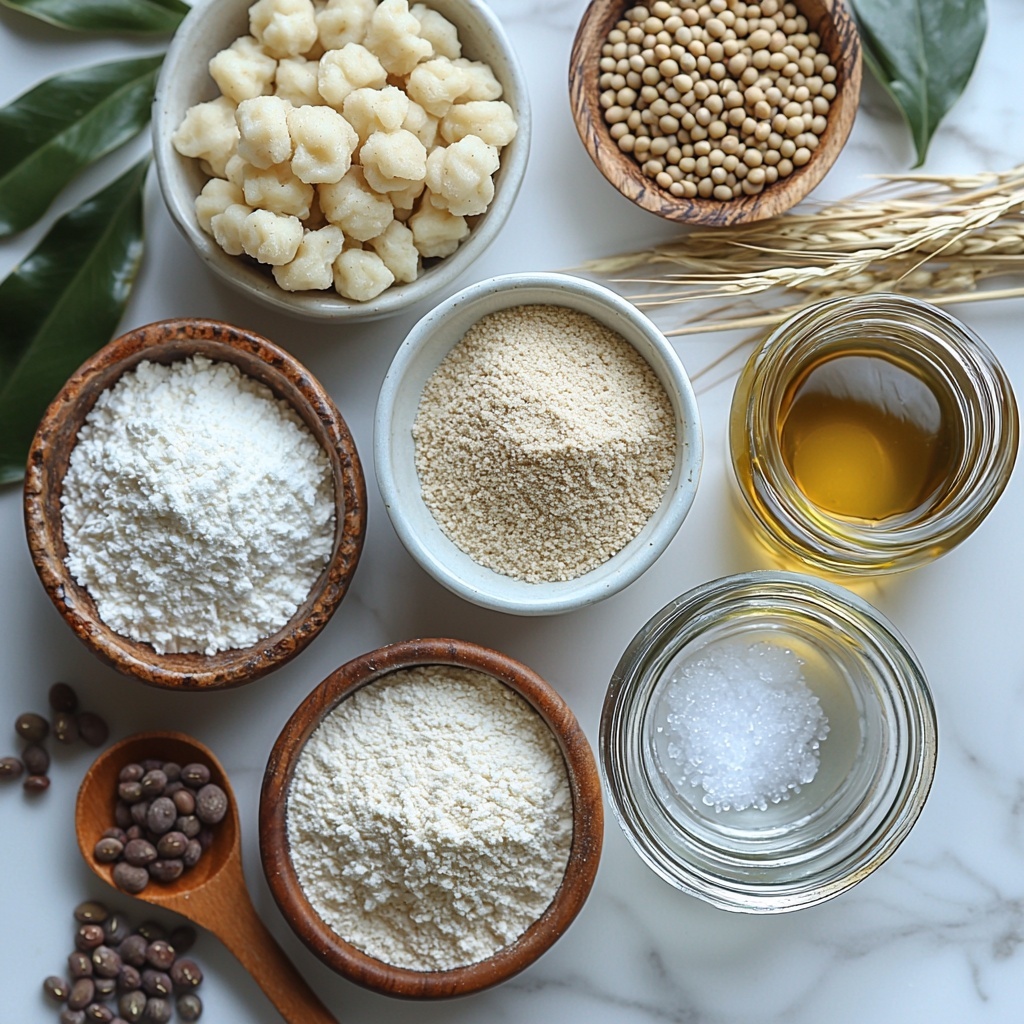
The recipe calls for simple, wholesome ingredients that come together effortlessly. Each one plays a vital role in shaping the texture, flavor, and aroma of the Kinako Mochi Waffles: An Amazing Ultimate Recipe, ensuring you get that signature chewy softness and rich, nutty undertone.
- 1 cup glutinous rice flour: The star ingredient that gives the waffles their characteristic chewiness and structure.
- 1/2 cup kinako (roasted soybean flour): Provides a warm, nutty flavor that transforms these waffles into a truly unique treat.
- 1/4 cup granulated sugar: Adds just the right amount of sweetness without overpowering the subtle kinako flavor.
- 1/2 teaspoon baking powder: Helps the waffles get a little lift and a light texture.
- 1/4 teaspoon salt: Balances the sweetness and enhances all the other flavors.
- 1 cup water: Combines the dry ingredients and creates a smooth batter perfect for cooking.
- 1 tablespoon vegetable oil (plus more for the waffle iron): Keeps the waffles moist and ensures they don’t stick to your waffle iron.
- 1 teaspoon vanilla extract (optional): Adds a gentle aromatic note that complements the kinako and mochi beautifully.
How to Make Kinako Mochi Waffles: An Amazing Ultimate Recipe
Step 1: Preheat the Waffle Iron
Start by preheating your waffle iron to the manufacturer’s recommended temperature. Getting the iron hot enough is crucial so that your Kinako Mochi Waffles develop that gorgeous golden crust and crispy edge, while maintaining their soft interior.
Step 2: Mix Dry Ingredients
In a large mixing bowl, whisk together the glutinous rice flour, kinako, granulated sugar, baking powder, and salt. Combining these dry ingredients well ensures each waffle will have that balanced chewy texture paired with a hint of nutty sweetness.
Step 3: Combine Wet Ingredients
In another bowl, stir together the water, vegetable oil, and vanilla extract if using. The oil helps keep the waffles tender and prevents sticking, while the vanilla adds a subtle fragrance that brings it all home.
Step 4: Make the Batter
Gradually pour the wet ingredients into the dry ones, stirring gently until you achieve a smooth batter. Aim for a lump-free mix, so your Kinako Mochi Waffles cook evenly and have that perfect bite each time.
Step 5: Grease the Waffle Iron
Brush or spray the waffle iron with a bit of vegetable oil. This small step is key to releasing the waffles easily after cooking and keeps the surfaces looking beautiful without any stuck bits.
Step 6: Cook the Waffles
Pour enough batter into the waffle iron to fill the grids evenly, then close the lid and cook for about 5 to 7 minutes. You’ll know they’re ready when the waffles turn golden brown on the outside and develop that lovely crispy crust that contrasts with the chewy interior.
Step 7: Cool and Repeat
Carefully remove each waffle and let it cool slightly on a wire rack to keep it crisp. Remember to re-grease the iron between batches to maintain nonstick surfaces and consistent cooking results. Repeat until all the batter is used, then prepare to savor your creations!
How to Serve Kinako Mochi Waffles: An Amazing Ultimate Recipe
Garnishes
These waffles shine on their own, but a few thoughtful toppings can elevate them even further. A dusting of extra kinako powder or a drizzle of honey adds natural sweetness and complementary flavor. If you’re feeling adventurous, a dollop of whipped cream or a spoonful of sweet red bean paste offers a traditional Japanese touch that beautifully enhances the waffle’s profile.
Side Dishes
Pairing your Kinako Mochi Waffles with fresh fruits like sliced strawberries or bananas can bring a refreshing contrast that’s perfect for brunch. For a savory twist, try them alongside lightly salted edamame or miso soup, turning these waffles into a balanced meal that’s both comforting and unique.
Creative Ways to Present
For a fun presentation, stack multiple waffles and layer them with spreads like sweetened cream cheese or anko (red bean paste) between each. Or create bite-sized waffle cubes to skewer with fruit and drizzle with a kinako-honey glaze. These creative spins not only look gorgeous but make eating your Kinako Mochi Waffles an even more joyful experience.
Make Ahead and Storage
Storing Leftovers
Once cooled completely, store your Kinako Mochi Waffles in an airtight container in the refrigerator. They will stay fresh and delicious for 3 to 4 days, making for a convenient and tasty treat whenever hunger strikes again.
Freezing
If you want to enjoy these waffles beyond a few days, freezing is a fantastic option. Place the cooled waffles in a single layer on a baking sheet to freeze them individually, then transfer them to a freezer-safe bag or container. Properly stored, they can last up to one month without losing their signature texture and flavor.
Reheating
To bring leftover or frozen Kinako Mochi Waffles back to life, use a toaster or toaster oven. This method crisps the exterior again while keeping the inside soft and chewy. Avoid microwaving as it can make the waffles too soft and lose their delightful texture.
FAQs
Can I substitute regular rice flour for glutinous rice flour?
While regular rice flour can be used, it will not provide the same chewy texture that glutinous rice flour offers. For authentic Kinako Mochi Waffles with their signature chew, sticking to glutinous rice flour is best.
Is kinako flour easy to find?
Kinako is becoming more widely available in Asian grocery stores or online. It’s worth seeking out for this recipe, as it delivers the distinctive nutty flavor that sets these waffles apart.
Can I make the batter ahead of time?
It’s recommended to prepare the batter fresh right before cooking to ensure the best texture. If you must make it ahead, store it covered in the refrigerator for no more than a few hours and give it a good stir before using.
Are Kinako Mochi Waffles gluten-free?
Yes! Because they are made with glutinous rice flour, not wheat flour, these waffles are naturally gluten-free, making them a great option for those with gluten sensitivities.
What toppings pair best with these waffles?
Sweet toppings like honey, maple syrup, red bean paste, or whipped cream enhance the nutty kinako flavor beautifully. Fresh fruits and a sprinkle of extra kinako powder add texture and freshness for an irresistible finish.
Final Thoughts
There’s something truly special about the combination of chewy mochi and roasted soybeans in Kinako Mochi Waffles: An Amazing Ultimate Recipe. These waffles invite you to explore a new world of texture and flavor that’s both comforting and exciting. Give this recipe a go—you might just find your new favorite waffle experience!
Print
Kinako Mochi Waffles: An Amazing Ultimate Recipe
- Prep Time: 15 minutes
- Cook Time: 20 minutes
- Total Time: 35 minutes
- Yield: 4-6 waffles
- Category: Breakfast
- Method: Baking
- Cuisine: Japanese
- Diet: Vegetarian
Description
Kinako Mochi Waffles combine the chewy texture of mochi with the nutty flavor of kinako (roasted soybean flour) in a delightful waffle form. These waffles are crispy on the outside and soft on the inside, perfect for a unique breakfast or snack option that blends traditional Japanese flavors with a modern twist.
Ingredients
Dry Ingredients
- 1 cup glutinous rice flour
- 1/2 cup kinako (roasted soybean flour)
- 1/4 cup granulated sugar
- 1/2 teaspoon baking powder
- 1/4 teaspoon salt
Wet Ingredients
- 1 cup water
- 1 tablespoon vegetable oil (plus more for greasing)
- 1 teaspoon vanilla extract (optional)
Instructions
- Preheat the Waffle Iron: Begin by preheating your waffle iron according to the manufacturer’s instructions to ensure even cooking.
- Mix Dry Ingredients: In a large mixing bowl, whisk together the glutinous rice flour, kinako, granulated sugar, baking powder, and salt until thoroughly combined.
- Mix Wet Ingredients: In a separate bowl, combine the water, vegetable oil, and vanilla extract (if using), mixing well.
- Combine Mixtures: Gradually pour the wet ingredients into the dry ingredients, stirring until the batter is smooth and free of lumps.
- Grease the Waffle Iron: Lightly brush vegetable oil over the preheated waffle iron to prevent sticking.
- Cook the Waffles: Pour an appropriate amount of batter onto the waffle iron and spread evenly. Close the iron and cook for about 5-7 minutes until waffles are golden brown and crispy.
- Remove and Cool: Carefully remove the waffles and allow them to cool slightly on a wire rack to maintain crispiness.
- Repeat: Continue the process with the remaining batter, re-greasing the waffle iron as necessary.
Notes
- For extra crispiness, let the waffles cool on a wire rack instead of stacking them.
- You can serve these waffles with sweet toppings like honey, syrup, or fruit.
- If you don’t have vanilla extract, you can omit it without affecting the core flavor.
- Use fresh kinako for the best flavor, and store any leftover flour in an airtight container.


