
If you’re looking for a dish that combines creamy, cheesy, and smoky flavors with a satisfying, handheld form, then the Cheesy Crack Chicken Roll Ups Recipe is about to become your new obsession. This recipe transforms simple ingredients into golden, rolled-up parcels packed with shredded chicken, crispy bacon, and melty cheddar cheese, all wrapped in soft flour tortillas. The ranch seasoning adds that unmistakable zing that makes every bite so addictive. Trust me, once you make these roll ups, they’ll quickly move to the top of your favorite comfort food list!
Ingredients You’ll Need
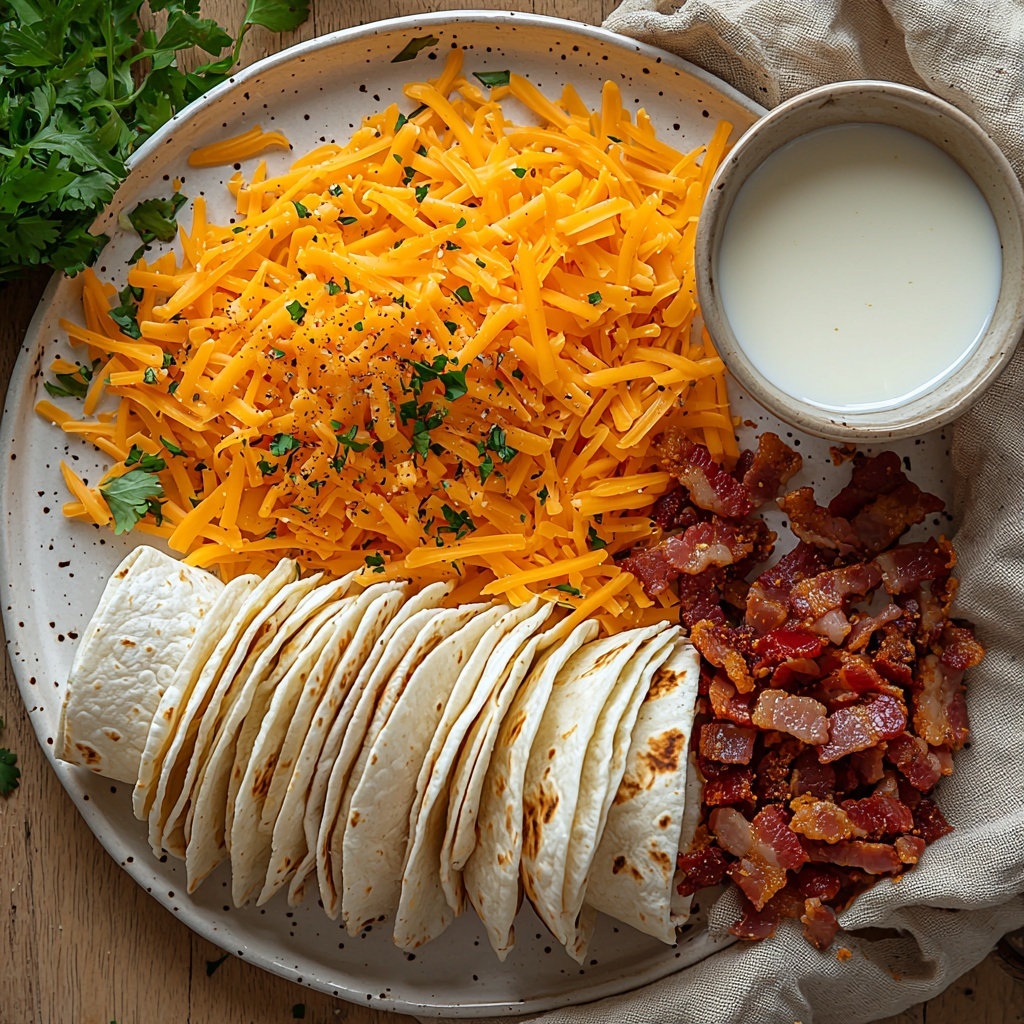
The beauty of the Cheesy Crack Chicken Roll Ups Recipe lies in its straightforward ingredients—each one plays a vital role, whether it’s for creamy texture, bold flavor, or a perfect melty finish. These essentials come together to create a rich and savory experience that’s both comforting and crowd-pleasing.
- Cream cheese (9 oz): Softened to room temperature to ensure a smooth, creamy base that binds all the flavors beautifully.
- Ranch dressing mix (2.5 tbsp): Adds a tangy, herbaceous kick that makes the flavors pop.
- Cheddar cheese (1.25 cups, shredded): Sharp and melty, this cheese offers that luscious cheesy pull you crave.
- Milk (1.5 tbsp): Whole milk enriches the cheese mixture, creating a silky texture.
- Bacon (3/4 cup, cooked and crumbled): Crispy bacon bits give the roll ups a smoky crunch that complements the creamy filling perfectly.
- Chicken (1 cup, cooked and shredded): Tender shredded chicken is the hearty protein base that makes these roll ups a meal.
- Garlic powder (1/4 tsp): Just a hint to deepen the flavor profile without overpowering.
- Burrito tortillas (5, 10-inch flour): Soft and pliable tortillas act as the vessel to hold all the delicious filling together.
How to Make Cheesy Crack Chicken Roll Ups Recipe
Step 1: Prepare the Creamy Filling
Start by mixing the softened cream cheese with the ranch dressing mix, shredded cheddar, milk, garlic powder, cooked shredded chicken, and crumbled bacon in a large bowl. Stir well until everything is evenly combined into a luscious, cheesy, and savory filling. This mixture is the heart and soul of your roll ups, setting the stage for that irresistible flavor combination.
Step 2: Assemble the Roll Ups
Lay the flour tortillas flat on a clean surface. Spread a generous amount of the creamy chicken filling evenly over each tortilla, leaving about half an inch from the edges for easy rolling. This step is key to distributing every yummy bite through each roll up, ensuring no tortilla is left behind in flavor or texture.
Step 3: Roll and Secure
Carefully roll each tortilla tightly from one edge to the other, creating a neat and compact roll up. If needed, you can secure the ends with a toothpick to keep them snug, especially if you plan to handle them before cooking.
Step 4: Cook Until Golden
Heat a non-stick skillet over medium heat and place the roll ups seam side down initially to seal them. Cook each roll up for about 3 to 4 minutes on each side or until the tortillas are golden and slightly crispy, and the cheese inside has melted to perfection. This cooking method adds a delightful crunch that contrasts so wonderfully with the creamy inside.
How to Serve Cheesy Crack Chicken Roll Ups Recipe
Garnishes
Sprinkle freshly chopped green onions or some chopped cilantro over the top to add a fresh, vibrant touch. A dollop of sour cream or a drizzle of spicy ranch dressing can also elevate the dish, layering in cooling creaminess or an extra flavor punch.
Side Dishes
This recipe pairs beautifully with simple sides like a crisp garden salad or steamed veggies to balance the richness. For a heartier meal, serve alongside seasoned rice or roasted potatoes to complement the savory roll ups with additional textures.
Creative Ways to Present
Slice the roll ups diagonally and arrange them on a platter for a stunning appetizer spread. You can also stack them on individual plates for a casual dinner or pack them into meal prep containers for a grab-and-go lunch that feels special every time.
Make Ahead and Storage
Storing Leftovers
Store any leftover roll ups in an airtight container in the refrigerator for up to 3 days. They keep their cheesy goodness and moisture well, so you won’t miss out on flavor when you want a quick snack or meal later on.
Freezing
To freeze, wrap each cooked roll up tightly in plastic wrap and place them in a freezer-safe bag or container. They can be frozen for up to 2 months, making them an excellent option for meal prep or saving time on busy days.
Reheating
Reheat the roll ups in a preheated oven at 350°F (175°C) for about 10-15 minutes until warmed through and crispy again. Alternatively, a quick zap in the microwave works in a pinch, but reheating in the oven preserves that lovely crunch you want.
FAQs
Can I use different types of cheese in this recipe?
Absolutely! While cheddar provides a classic sharp flavor, feel free to experiment with mozzarella for stretchiness, pepper jack for some heat, or a blend for extra complexity.
Is it okay to use pre-cooked rotisserie chicken?
Yes, using rotisserie chicken is a fantastic shortcut that adds convenience without sacrificing flavor since the meat is already juicy and seasoned.
Can these roll ups be made gluten-free?
Yes, substitute the flour tortillas with your favorite gluten-free tortillas to accommodate dietary needs while keeping the delicious taste intact.
What’s the best way to cook the bacon for the roll ups?
Cooking bacon until it’s crispy on the stovetop or in the oven ensures it adds maximum crunch and smoky flavor without sogginess when combined in the filling.
Can I prepare the filling in advance?
Definitely! The filling can be made a day ahead and refrigerated, which makes assembly a breeze when you’re ready to cook and enjoy your Cheesy Crack Chicken Roll Ups Recipe.
Final Thoughts
The Cheesy Crack Chicken Roll Ups Recipe is truly one of those special dishes that feels like a warm hug on a plate. It’s easy to make, incredibly flavorful, and perfect for everything from family dinners to casual get-togethers. I genuinely hope you give this recipe a try and see how quickly it becomes a beloved staple in your home. Once you take that first bite, you’ll understand why it’s called “cheesy crack” — it’s downright addictive!
Print
Delicious Recipe
- Prep Time: 15 minutes
- Cook Time: 25 minutes
- Total Time: 40 minutes
- Yield: 4 servings (5 roll ups)
- Category: Appetizer
- Method: Baking
- Cuisine: American
- Diet: Gluten Free
Description
Cheesy Crack Chicken Roll Ups are creamy, cheesy, and packed with flavorful chicken and bacon wrapped in warm flour tortillas. This easy-to-make appetizer or snack combines cream cheese, ranch seasoning, cheddar cheese, and shredded chicken to create a deliciously comforting dish that everyone will love. Perfect for game days, parties, or a quick snack, these roll ups are baked to melty perfection and guaranteed to be a crowd-pleaser.
Ingredients
Filling Ingredients
- 9 oz cream cheese, softened to room temperature
- 2.5 tbsp ranch dressing mix
- 1.25 cup cheddar cheese, shredded
- 1.5 tbsp milk (whole milk recommended for richness)
- 3/4 cup bacon, cooked and crumbled
- 1 cup chicken, cooked and shredded
- 1/4 tsp garlic powder
Other Ingredients
- 5 burrito tortillas (10-inch flour tortillas)
Instructions
- Preheat Oven: Preheat your oven to 375°F (190°C) to prepare for baking the roll ups.
- Make the Filling: In a medium bowl, combine the softened cream cheese, ranch dressing mix, shredded cheddar cheese, milk, crumbled bacon, shredded chicken, and garlic powder. Mix thoroughly until all ingredients are evenly incorporated.
- Assemble Roll Ups: Lay out each burrito tortilla flat on a clean surface. Evenly distribute the cheesy chicken mixture along the center of each tortilla. Carefully roll each tortilla tightly to encase the filling.
- Bake the Roll Ups: Place the rolled tortillas seam side down on a baking sheet. Bake in the preheated oven for 20 to 25 minutes or until the tortillas are golden brown and the filling is hot and melty.
- Serve: Remove from the oven and let cool slightly before slicing if desired. Serve warm as a tasty appetizer, snack, or meal accompaniment.
Notes
- For extra crispiness, brush the tortillas lightly with melted butter or oil before baking.
- You can substitute ranch dressing mix with your favorite seasoning blend if desired.
- Leftover roll ups can be stored in an airtight container in the refrigerator for up to 3 days.
- Reheat in the oven or air fryer for best results instead of the microwave to keep them crisp.
- Use rotisserie chicken to save time on cooking the chicken if preferred.


