
“`html
If you’ve ever wondered how to turn a simple jar of pickles into an irresistible snack, then this Crispy Fried Pickles Recipe is your golden ticket. Imagine biting into a perfect crispy crust that gives way to the tangy, juicy snap of dill pickles—it’s an addictive combination that delights the senses. Whether you’re looking for a fun appetizer for a gathering or just craving some crunchy comfort food, this recipe brings that perfect balance of flavors and textures to your plate in under 30 minutes.
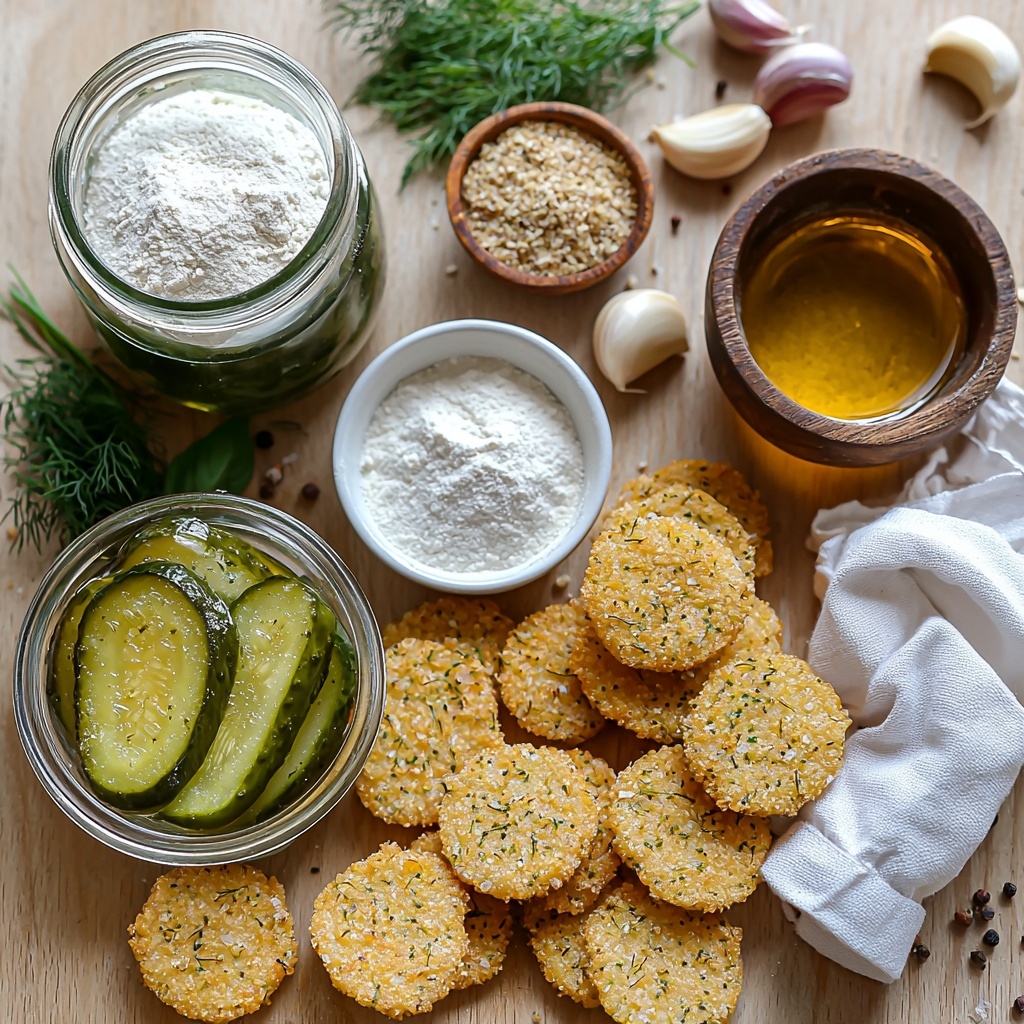
Ingredients You’ll Need
This Crispy Fried Pickles Recipe relies on a handful of staples that come together to create magic. Each ingredient plays a crucial role, from the seasoning that packs punch to the panko breadcrumbs that give you that satisfying crunch.
- Vegetable oil: Essential for frying the pickles to a golden, crispy perfection without overpowering their flavor.
- 1 (16-ounce) jar dill pickle slices: The star of the show, bringing that tangy juiciness to every bite; make sure to drain and dry them well!
- ½ cup all-purpose flour: Helps create a smooth batter base that sticks to the pickles and holds the coating together.
- 2 teaspoons garlic salt: Adds a savory depth that complements the sharpness of the pickles beautifully.
- 1 teaspoon Italian seasoning: Brings an herby warmth that elevates the flavor profile with hints of oregano, basil, and more.
- ¼ teaspoon pepper: A subtle kick to balance the acidity of the pickles.
- ¾ cup water: Mixed with the dry ingredients to make a smooth batter that evenly coats the slices.
- 1½ cups panko breadcrumbs: The secret to achieving that irresistibly crunchy exterior that clings to the battered pickles.
How to Make Crispy Fried Pickles Recipe
Step 1: Preparing the Oil and Pickles
Begin by filling a frying pan with about half an inch of vegetable oil and heating it over medium-high until it reaches 350–375°F. While the oil heats, drain your pickle slices thoroughly and pat them dry with paper towels. Removing as much moisture as possible helps the batter stick and makes the pickles crisp up beautifully without splattering.
Step 2: Making the Batter
In a shallow bowl, whisk together the all-purpose flour, garlic salt, Italian seasoning, and pepper. Gradually add water and mix until you get a smooth batter. This mixture forms the flavor-packed foundation that clings to every pickle slice, ensuring each bite bursts with taste and crunch.
Step 3: Preparing the Breadcrumb Coating
Pour the panko breadcrumbs into a separate shallow dish. Panko is vital here—it creates that light, airy crust that stays crispy long after frying. Having your breadcrumbs ready means you can work swiftly as you move through the dipping process.
Step 4: Coating the Pickles
Working in batches, drop the dried pickle slices into the batter, giving them a good toss to coat thoroughly. Then immediately dip each piece into the panko breadcrumbs, pressing gently to ensure every side is covered. This double-layer coating promises an evenly crispy exterior that seals in the pickle’s juiciness.
Step 5: Frying to Golden Perfection
Carefully place your coated pickles in the hot oil and fry them for 1 to 2 minutes on each side, until they develop a gorgeous golden brown color. Don’t crowd the pan—frying in batches lets the oil temperature stay just right for that perfect crunch. Once fried, transfer the pickles onto paper towels to drain excess oil and maintain their crispness.
Step 6: Serving Immediately
The best part of this Crispy Fried Pickles Recipe is enjoying them fresh from the pan, while still warm and crunchy. For the ultimate classic experience, serve them alongside chilled Ranch dressing that complements the tangy bite with creamy coolness.
How to Serve Crispy Fried Pickles Recipe
Garnishes
Keep it simple with a sprinkle of fresh chopped parsley or a dusting of smoked paprika to add a pop of color and a subtle smoky note. These little touches make your plate look inviting and can heighten the flavor profile without competing with the pickles.
Side Dishes
Crispy fried pickles pair wonderfully with light, fresh sides like coleslaw or a zesty corn salad. If you’re going for a heartier spread, try them alongside burgers, sandwiches, or even buffalo wings for an irresistible Southern-inspired feast.
Creative Ways to Present
Try skewering multiple fried pickles and serving them as fun finger food at your next party, or use them as an unexpected crunchy topping on burgers or salads. You can even experiment with different dipping sauces like spicy aioli or blue cheese dressing to personalize your Crispy Fried Pickles Recipe experience.
Make Ahead and Storage
Storing Leftovers
If you happen to have any leftovers, store them in an airtight container in the refrigerator for 3-4 days. Because the coating tends to soften over time, it’s best to refrigerate them uncovered for a short while before reheating to restore some of the crispiness.
Freezing
Although fried pickles are at their best fresh, you can freeze leftover cooked pickles by first flash freezing them on a tray and then transferring to a freezer-safe bag. Freeze for up to 1 month. To keep their crunch, avoid thawing before reheating.
Reheating
For the crispiest results when reheating, use a conventional oven or air fryer at 375°F for about 5-7 minutes. This will revive the golden crust without drying out the pickle inside, keeping your Crispy Fried Pickles Recipe as close to freshly made as possible.
FAQs
Can I use a different type of pickle for this recipe?
Absolutely! While dill pickle slices are classic, bread-and-butter pickles or spicy pickles can add a unique twist. Just remember that sweeter pickles will create a different flavor balance, so choose according to your taste preference.
Is it necessary to pat the pickles dry before frying?
Yes, removing excess moisture is crucial. Wet pickles can make the batter slide off and cause the oil to splatter, which is less safe and affects the final crispiness. Patting them dry ensures the batter sticks well and fries up crispy.
Can I bake these instead of frying?
You can bake them for a lighter version, though they won’t get quite as crispy. Arrange coated pickles on a baking sheet sprayed with oil and bake at 425°F for 15-20 minutes, flipping halfway through. They’ll still be delicious but won’t have that signature fried crunch.
What dipping sauces go best with Crispy Fried Pickles Recipe?
Ranch dressing is the classic choice and pairs perfectly with the tang and texture, but spicy mayo, blue cheese dip, or even a honey mustard sauce can be excellent complements to this snack.
How do I know when the oil is at the right frying temperature?
The ideal temperature is between 350 and 375°F. You can use a kitchen thermometer for accuracy or test by dropping a small bit of batter in the oil—it should sizzle and rise immediately without burning quickly.
Final Thoughts
This Crispy Fried Pickles Recipe is one of those simple yet spectacular dishes that never fails to impress. The harmony between crunchy, flavorful batter and zesty pickles makes it a perfect snack or appetizer any time you crave something special. Trust me, once you try these, they’ll quickly become a fixture in your recipe arsenal—so grab that jar of pickles and let’s get frying!
“`
Print
Crispy Fried Pickles Recipe
- Prep Time: 10 minutes
- Cook Time: 15 minutes
- Total Time: 25 minutes
- Yield: 6 servings
- Category: Appetizer
- Method: Frying
- Cuisine: American
Description
Crispy Fried Pickles are a delicious, golden-brown appetizer that’s quick to make and perfect for snacking. Dill pickle slices are coated in a flavorful seasoned batter, dipped in crunchy panko breadcrumbs, and fried to perfection, resulting in a tangy and crispy treat served best with Ranch dressing.
Ingredients
For Frying
- Vegetable oil, for frying
Pickles
- 1 (16-ounce) jar dill pickle slices
Batter
- ½ cup all-purpose flour
- 2 teaspoons garlic salt
- 1 teaspoon Italian seasoning
- ¼ teaspoon pepper
- ¾ cup water
Coating
- 1½ cups panko breadcrumbs
Instructions
- Heat Oil: Fill a frying pan with ½ inch of vegetable oil and heat over medium-high heat until the temperature reaches 350–375°F, ensuring the oil is hot enough to crisp the pickles without absorbing excess oil.
- Prepare Pickles: Drain the pickle slices from the jar and place them on paper towels. Pat them dry thoroughly to remove excess moisture, which helps the batter adhere better and prevents oil splatters.
- Make Batter: In a shallow bowl, whisk together the all-purpose flour, garlic salt, Italian seasoning, and pepper. Gradually add water while whisking to create a smooth batter coating.
- Prepare Breadcrumbs: Spread the panko breadcrumbs evenly in a separate shallow dish for coating.
- Batter the Pickles: Working in batches, dip the dried pickle slices into the batter, tossing to coat them evenly. Then transfer the battered pickles to the dish with panko breadcrumbs and press gently to coat all sides completely.
- Fry Pickles: Carefully place the coated pickles into the hot oil in batches, frying for about 1–2 minutes on each side or until they turn golden brown and crispy. Avoid overcrowding the pan to maintain oil temperature.
- Drain and Serve: Remove the fried pickles with a slotted spoon and place them on paper towels to drain excess oil. Serve immediately while hot, ideally with Ranch dressing for dipping.
Notes
- Ensure pickles are well-drained and patted dry to avoid excess moisture which can cause oil splatter.
- Do not overcrowd the frying pan to keep oil temperature stable and ensure even cooking.
- Use panko breadcrumbs for extra crispiness compared to regular breadcrumbs.
- Serve immediately for the best texture; fried pickles may become soggy if left standing too long.
- Adjust seasoning in the batter to taste for more spice or garlic flavor.
- Vegetable oil is preferred for frying due to its high smoke point.

