If you’re searching for a treat that perfectly balances sweet, nutty, chewy, and a little bit of spice, then you’ve got to try this Hanky Pankys Recipe. These delightful little bites are a nostalgic crowd-pleaser, delivering warm brown sugar caramel richness alongside oats, coconut, and your choice of nuts or seeds. Each batch comes together in just 25 minutes and yields 24 satisfying servings that everyone will want to go back for. Trust me, once you make Hanky Pankys, they’ll become your new go-to snack for any occasion!
Ingredients You’ll Need
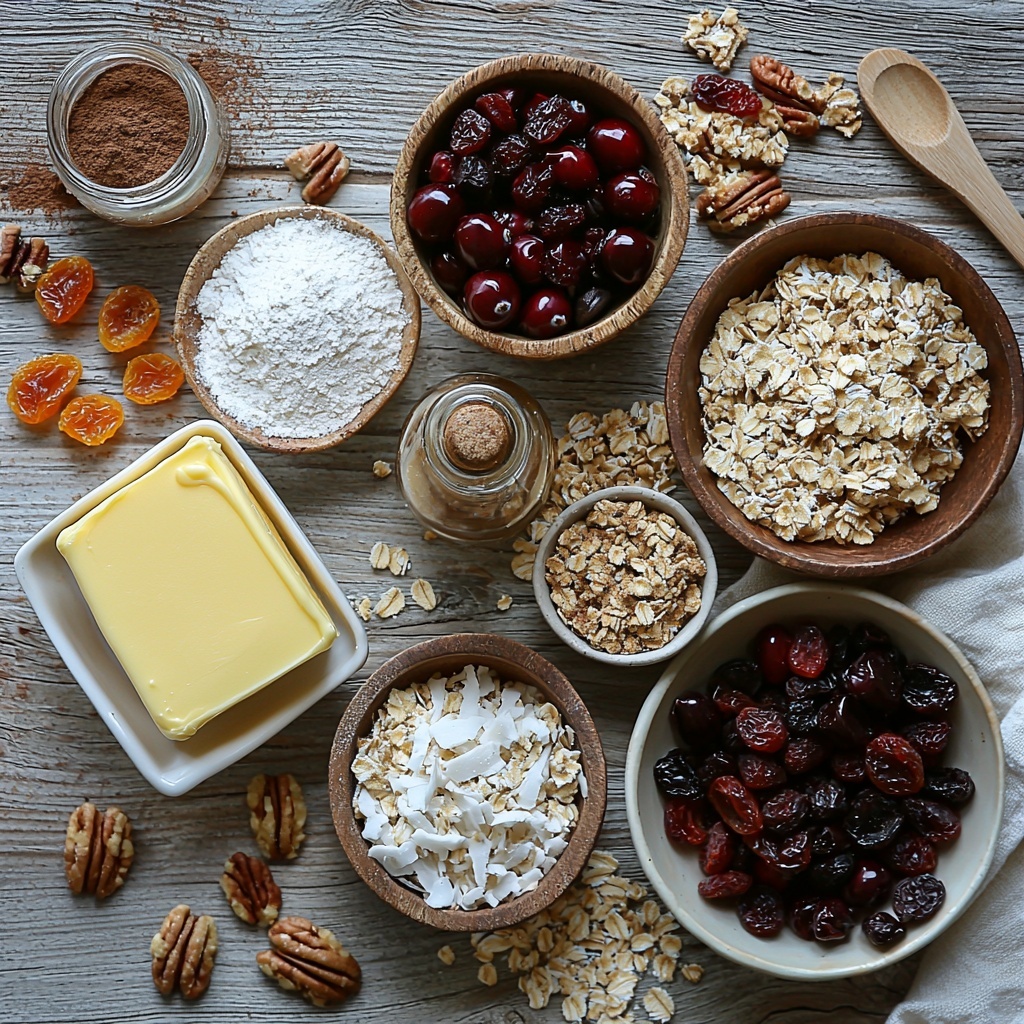
The magic of Hanky Pankys lies in how simple and wholesome the ingredients are, each bringing its own lovely texture and flavor. These pantry-friendly staples make for an easy yet irresistible bake that’s full of both crunch and chew.
- 1/2 cup (1 stick) butter: Provides that rich, creamy base and helps caramelize the sugar perfectly.
- 1 cup brown sugar, packed: Adds a deep, molasses-like sweetness that gives the bars their signature gooey texture.
- 1 cup all-purpose flour (or gluten-free flour blend): The foundation that gives structure to the cookies, adaptable if you prefer gluten-free.
- 1 cup oats: Adds hearty chewiness and wholesome texture to every bite.
- 1/2 cup chopped walnuts or pecans (or sunflower seeds): Offers a delightful crunch; seeds make a great nut-free alternative.
- 1/2 cup shredded coconut: Brings a hint of tropical sweetness and a subtle chewiness.
- 1 teaspoon vanilla extract: Enhances the overall flavor with warm, aromatic notes.
- 1/4 teaspoon salt: Balances sweetness and accentuates all the delicious flavors.
- 1/2 cup chocolate chips: Use dark, milk, or white for melty bursts of chocolate richness.
- 1/2 cup chopped dried fruit: Cranberries, cherries, or apricots add pops of tangy, chewy delight.
- 1/2 teaspoon cinnamon, nutmeg, or pumpkin spice: Optional, but highly recommended for a warm spiced twist.
How to Make Hanky Pankys Recipe
Step 1: Prepare the Baking Tray
Begin by preheating your oven to 350°F (175°C) so it’s ready for baking. Line a baking sheet with parchment paper or lightly grease it—this simple step is crucial to prevent your Hanky Pankys from sticking and ensures they’ll bake evenly and release easily from the tray.
Step 2: Melt the Butter and Sugar Mix
On medium heat, melt the butter together with the packed brown sugar in a saucepan. Stir constantly until the sugar is fully dissolved and the mixture looks smooth, glossy, and caramel-like. This rich base is what gives the cookies their irresistibly chewy and sweet character.
Step 3: Combine Dry Ingredients
While the butter and sugar mixture cools just a bit, combine the flour (or your gluten-free blend), oats, chopped walnuts or sunflower seeds, shredded coconut, salt, and any warm spices you want to include in a large mixing bowl. This mixture builds a hearty and textured foundation that contrasts beautifully with the gooey caramel.
Step 4: Mix Wet and Dry Components
Pour the warm butter-sugar mixture into the bowl with dry ingredients and add the vanilla extract. Stir everything thoroughly so every ingredient is coated in the luscious caramel glaze. Once mixed, toss in your chocolate chips and dried fruit for bursts of sweetness and complexity that make these treats so addictive.
Step 5: Shape and Bake
Using a spoon, drop portions of the dough onto your prepared baking sheet, then gently flatten each mound into thin rounds with the back of the spoon. Bake in the preheated oven for 12-15 minutes or until the edges turn a gorgeous golden brown and the centers are set but still have a slight chewiness, exactly how Hanky Pankys should be.
Step 6: Cool and Enjoy
Remove the cookies from the oven and allow them to cool on the baking sheet for a few minutes, which helps them firm up without losing that tender chew. Then transfer to a wire rack to cool completely—this step perfects the crispness around the edges that everyone loves.
How to Serve Hanky Pankys Recipe
Garnishes
These scrumptious treats don’t need much, but you can sprinkle a pinch of flaky sea salt on top before baking for an extra flavor punch. A light dusting of powdered sugar right before serving adds a pretty, festive touch too.
Side Dishes
Hanky Pankys pair beautifully with a comforting mug of coffee or tea, making them ideal for breakfast or an afternoon snack. You can also serve them alongside fresh fruit or a scoop of vanilla ice cream for a sweet dessert plate.
Creative Ways to Present
Try stacking Hanky Pankys in a rustic basket for a party platter or gift them in a mason jar layered with parchment paper to share the love. For an elegant twist, drizzle melted chocolate over the tops before baking or add chopped nuts on top for an extra crunch.
Make Ahead and Storage
Storing Leftovers
Keep your Hanky Pankys in an airtight container at room temperature, where they will stay fresh and chewy for 3-4 days. This makes them perfect to bake ahead for busy days or snack cravings.
Freezing
If you want to enjoy Hanky Pankys later, freeze them in a sealed container or zip-top bag for up to 3 months. Be sure to separate layers with parchment paper to prevent sticking and to preserve their texture.
Reheating
To revive that fresh-out-of-the-oven texture, warm leftover Hanky Pankys in a preheated 300°F oven for about 5 minutes or pop them in the microwave for 10-15 seconds. They’ll regain their gooey warmth and delicious aroma instantly.
FAQs
Can I make Hanky Pankys gluten-free?
Yes! Just substitute the all-purpose flour with a gluten-free flour blend. The texture and taste remain just as wonderful, and everyone can enjoy these treats.
What nuts work best in this recipe?
Walnuts and pecans are traditional favorites, but feel free to swap in chopped almonds, hazelnuts, or even sunflower seeds for a nut-free version. Each option brings its own unique crunch and flavor.
Can I omit the dried fruit or chocolate chips?
Absolutely! While they add great flavor and texture, you can customize the recipe by leaving out ingredients you don’t love or have on hand. The base is still delicious on its own.
How do I prevent Hanky Pankys from sticking to the baking sheet?
Make sure to line your baking sheet with parchment paper or lightly grease it before baking. This simple step keeps your cookies intact and easy to remove.
Are these cookies suitable for holiday gifting?
Definitely! Hanky Pankys make charming, homemade gifts that look and taste impressive without requiring hours in the kitchen. Package them in festive tins or boxes for a personal touch.
Final Thoughts
Now that you know all about this incredible Hanky Pankys Recipe, it’s time to roll up your sleeves and whip up a batch. These chewy, richly sweet treats are a true delight to make and share, and they’ll bring smiles to everyone lucky enough to try them. Trust me, once Hanky Pankys enter your baking repertoire, they won’t leave your heart or your oven anytime soon!
Print
Hanky Pankys Recipe
- Prep Time: 10 minutes
- Cook Time: 15 minutes
- Total Time: 25 minutes
- Yield: 24 servings
- Category: Dessert
- Method: Baking
- Cuisine: American
- Diet: Vegetarian
Description
Hanky Pankys are delightful chewy bars combining oats, nuts, coconut, and a caramel-like butter and brown sugar base, perfect for a quick and satisfying treat. These no-bake bars baked into golden rounds offer a flavorful mix of textures and can be customized with chocolate chips, dried fruit, and spices for extra flair.
Ingredients
Wet Ingredients
- 1/2 cup (1 stick) butter
- 1 cup brown sugar, packed
- 1 teaspoon vanilla extract
Dry Ingredients
- 1 cup all-purpose flour (or gluten-free flour blend for gluten-free version)
- 1 cup oats
- 1/2 cup chopped walnuts or pecans (or sunflower seeds for nut-free)
- 1/2 cup shredded coconut
- 1/4 teaspoon salt
- 1/2 teaspoon cinnamon, nutmeg, or pumpkin spice (optional)
Add-Ins
- 1/2 cup chocolate chips (dark, milk, or white, optional)
- 1/2 cup chopped dried fruit (cranberries, cherries, apricots, optional)
Instructions
- Prepare the Baking Tray: Preheat your oven to 350°F (175°C) and line a baking sheet with parchment paper or lightly grease it to prevent sticking, ensuring the Hanky Pankys bake evenly and are easy to remove.
- Melt the Butter and Sugar Mix: In a saucepan over medium heat, melt the butter and brown sugar together while stirring constantly until the sugar dissolves and the mixture turns smooth and glossy, creating a rich caramel-like base.
- Combine Dry Ingredients: In a large bowl, mix the flour (or gluten-free flour blend), oats, chopped nuts or seeds, shredded coconut, salt, and optional spices thoroughly to form a textured base.
- Mix Wet and Dry Components: Pour the warm butter and sugar mixture into the dry ingredients along with the vanilla extract. Stir well until all ingredients are evenly coated in a sticky dough. Add any optional chocolate chips or dried fruit and combine.
- Shape and Bake: Drop spoonfuls of the mixture onto the prepared baking sheet, flattening each gently with the back of a spoon into small, thin rounds. Bake for 12-15 minutes or until edges turn golden brown and centers set.
- Cool and Enjoy: Allow the Hanky Pankys to cool on the baking sheet for several minutes before transferring them to a wire rack to cool completely. This helps them crisp up perfectly before serving.
Notes
- For a gluten-free version, substitute all-purpose flour with a gluten-free flour blend.
- Use sunflower seeds instead of nuts for a nut-free alternative.
- Customize with your choice of chocolate chips or dried fruits to vary flavor.
- Ensure not to overbake to maintain a chewy texture; watch for golden edges as an indicator.
- Store in an airtight container to keep them fresh and maintain texture.

