
“`html
If you have a sweet tooth and love the warm, comforting aroma of freshly baked treats, you are in for a real delight with this Homemade Honey Buns Recipe. Soft, tender dough swirled with cinnamon sugar and coated in a luscious honey-butter glaze creates the perfect balance of flavors that feels like a hug in pastry form. These honey buns are not just snacks; they’re a celebration of simple ingredients transformed into a show-stopping breakfast or afternoon indulgence that you’ll want to make again and again.
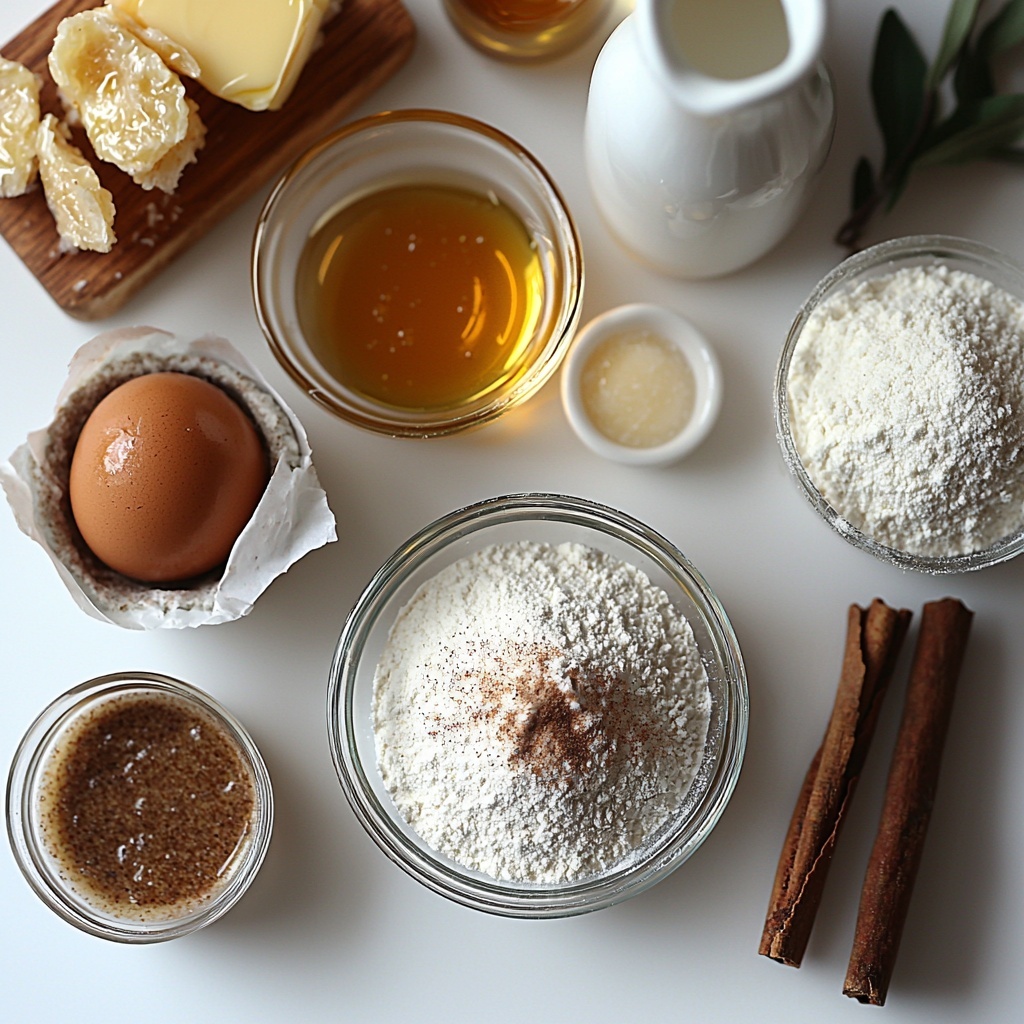
Ingredients You’ll Need
Nothing too fancy here—just pantry staples that come together beautifully to create a rich and tender dough, a cinnamon-sugar filling with that timeless warmth, and a heavenly honey glaze. Each ingredient plays a crucial role, whether it’s adding sweetness, depth, or that perfect golden color to your homemade honey buns.
- 2¼ cups all-purpose flour: Provides the structure and tenderness for the dough.
- ¼ cup granulated sugar: Adds a subtle sweetness to balance flavors.
- ½ tsp salt: Enhances flavor and balances the sweetness.
- ⅔ cup whole milk, warmed to about 110 °F: Activates the yeast for a beautiful rise and creates a soft texture.
- 1 packet (≈ 2¼ tsp) instant yeast: The magic that makes these buns fluffy and airy.
- ⅓ cup butter, melted and cooled: Adds richness and tenderness to the dough.
- 1 large egg: Brings moisture, color, and helps with structure.
- 2 tsp vanilla extract: Infuses a subtle, warm flavor that makes every bite irresistible.
- ¼ cup granulated sugar (for filling): Sweetens the cinnamon sugar layer.
- 1½ tsp ground cinnamon: Provides that classic cinnamon punch in the filling.
- 2–2½ cups vegetable oil (for frying): Enough to shallow-fry the buns to golden perfection.
- 3 tbsp butter, melted (for glaze): Adds luscious richness to the glaze.
- 1¼ cups powdered sugar, sifted: Gives the glaze its smooth, sweet texture.
- 2 tbsp honey: The star ingredient, giving the glaze a lovely, natural sweetness and shine.
- 2 tsp vanilla extract (for glaze): Elevates the glaze with a gentle aromatic depth.
- ½ tsp salt (for glaze): Balances the sweetness of the glaze perfectly.
- ⅓–½ cup hot water (for glaze): Used to thin the glaze to just the right consistency for dipping.
How to Make Homemade Honey Buns Recipe
Step 1: Prepare Your Dough Base
Start by combining the flour, granulated sugar, and salt in your stand mixer bowl. In a separate container, warm your whole milk to about 110 degrees Fahrenheit, then whisk in the instant yeast, melted butter, egg, and vanilla extract. This warm, fragrant wet mix is what wakes up the yeast and brings richness to your dough.
Step 2: Combine and Knead
Add the wet ingredients to your dry mixture and knead on medium speed using a dough hook for about 10 minutes. The dough should become slightly sticky yet elastic—trust this texture, it means your buns will come out soft and fluffy.
Step 3: First Rise
Grease a large bowl with vegetable oil and place your dough inside. Cover it snugly with plastic wrap and allow it to rise for 1½ hours or until it doubles in size. This patient stage is key to that light, airy texture.
Step 4: Roll and Layer the Filling
On a floured surface, punch down the dough and roll it out into a roughly 15-inch by 8-inch rectangle. Mix the cinnamon and sugar together, then sprinkle it evenly over the dough. Gently press it in so every bite has that unforgettable cinnamon sugar flavor.
Step 5: Roll and Slice
Tightly roll the dough lengthwise into a log. Dip your fingers in water and press along the seam to seal it well—this stops the filling from leaking during frying. Then slice the log into approximately 1-inch thick pieces using unscented floss or a sharp knife. Place the slices on wax paper, loosely cover with plastic wrap, and let them rise again for 30 minutes to build that lovely pillowy texture.
Step 6: Fry to Golden Perfection
Pour the vegetable oil into a pan to a depth suitable for shallow frying and heat it over medium-high heat. Fry your buns in batches, cooking for about 1½ to 2 minutes per side or until they are beautifully golden brown. Drain them on paper towels to keep them crisp yet tender.
Step 7: Make the Honey-Butter Glaze and Coat
While the buns are still warm, whisk together the melted butter, sifted powdered sugar, honey, vanilla extract, and salt. Slowly add hot water until the glaze is thick but pourable—perfect for dipping. Dunk each honey bun in the glaze to coat all sides, then place them on a cooling rack over parchment paper and let the glaze set for about 20 minutes. This glaze makes these buns truly unforgettable.
How to Serve Homemade Honey Buns Recipe
Garnishes
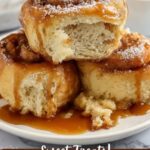
For an extra pop, sprinkle a little extra cinnamon or chopped toasted nuts like pecans or walnuts on top of the glaze after dipping. A light dusting of powdered sugar can also add an inviting snowy finish that looks as delightful as it tastes.
Side Dishes
Pair your honey buns with a fresh cup of coffee or chai tea to balance the sweetness. Warm, creamy drinks like hot chocolate or a glass of cold milk work beautifully, making each bite feel even more comforting and indulgent.
Creative Ways to Present
Serve your homemade honey buns on a rustic wooden board garnished with fresh mint leaves or edible flowers for a stunning brunch centerpiece. Alternatively, stack them in a charming basket lined with a colorful cloth towel to create a cozy, inviting vibe for family and friends.
Make Ahead and Storage
Storing Leftovers
Keep any leftover honey buns in an airtight container at room temperature for 3 to 4 days. This will preserve their softness and keep the glaze from drying out, allowing you to enjoy that fresh-baked flavor even days later.
Freezing
If you want to stash some for later, freeze the coated buns individually on a tray until firm, then transfer them to a freezer-safe container or bag. They’ll keep well for up to 1 month. When you’re ready, just thaw at room temperature and warm slightly to enjoy.
Reheating
To bring your honey buns back to life, warm them gently in a preheated oven at 300°F for about 5–7 minutes. This revives that fresh-from-the-pan softness and melty glaze without drying out the buns.
FAQs
Can I use active dry yeast instead of instant yeast?
Yes! If using active dry yeast, proof it first in the warm milk with a little sugar until bubbly before mixing it with the other ingredients. This extra step ensures your dough rises beautifully.
Is it possible to bake the honey buns instead of frying?
Absolutely—if you prefer baking, place the buns on a parchment-lined baking sheet and bake at 375°F for about 15–20 minutes until golden brown. Then apply the glaze while warm for best results.
What’s the secret to getting the glaze just right?
Slowly adding hot water to the glaze while whisking is key. You want a consistency thick enough to coat but still fluid to drip down the sides — a little patience here makes all the difference.
Can I make the dough by hand without a stand mixer?
Yes, just mix and knead by hand on a floured surface for about 10–12 minutes until smooth and elastic. It’s a great way to connect with the dough and feel the transformation yourself.
How do I prevent the honey buns from getting soggy after glazing?
Let the glaze set on a cooling rack so excess glaze can drip off. Also, store buns in a breathable container or loosely covered to keep the glaze glossy without trapping moisture underneath.
Final Thoughts
There’s something truly magical about making your own sweet treats from scratch, and this Homemade Honey Buns Recipe delivers that magic in every bite. Soft, fragrant dough, melt-in-your-mouth cinnamon sugar, and a honey glaze that sings with warmth and comfort—it’s the kind of recipe you’ll treasure and share over and over. I hope you dive right in and enjoy the experience as much as you enjoy eating them!
“`
Print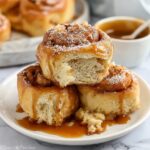
Homemade Honey Buns Recipe
- Prep Time: 15 minutes
- Cook Time: 15 minutes
- Total Time: 2 hours 30 minutes
- Yield: 12 servings
- Category: Dessert
- Method: Frying
- Cuisine: American
Description
These homemade honey buns are soft, fluffy, and filled with a sweet cinnamon-sugar filling. They are shallow-fried to golden perfection and coated in a luscious honey-butter glaze, making for an irresistible treat perfect for breakfast or dessert.
Ingredients
For the Dough:
- 2¼ cups all-purpose flour
- ¼ cup granulated sugar
- ½ tsp salt
- ⅔ cup whole milk, warmed to about 110 °F
- 1 packet (≈ 2¼ tsp) instant yeast
- ⅓ cup butter, melted and cooled
- 1 large egg
- 2 tsp vanilla extract
Cinnamon-Sugar Filling:
- ¼ cup granulated sugar
- 1½ tsp ground cinnamon
For Frying:
- 2–2½ cups vegetable oil (enough to shallow-fry buns)
Honey-Butter Glaze:
- 3 tbsp butter, melted
- 1¼ cups powdered sugar, sifted
- 2 tbsp honey
- 2 tsp vanilla extract
- ½ tsp salt
- ⅓–½ cup hot water, to thin glaze
Instructions
- Prepare dry ingredients: In a stand mixer bowl, combine the all-purpose flour, granulated sugar, and salt thoroughly.
- Mix wet ingredients: Warm the whole milk to about 110 °F, then whisk in the instant yeast, melted butter, egg, and vanilla extract until well combined.
- Knead the dough: Add the wet ingredients to the dry mixture and knead using the dough hook attachment on medium speed for about 10 minutes. Scrape down the sides occasionally. The dough should be slightly sticky but cohesive.
- First rise: Grease a large bowl with oil and place the dough inside. Cover with plastic wrap and let it rise in a warm place for 1½ hours or until it doubles in size.
- Shape the dough: Punch down the risen dough and transfer it to a floured surface. Roll out into a roughly 15-inch by 8-inch rectangle.
- Apply filling: Mix the cinnamon and sugar, then sprinkle evenly over the dough. Press gently to adhere the filling to the dough surface.
- Roll and seal: Roll the dough tightly lengthwise into a log. Dip your fingers in water and pinch the seam to seal the log completely.
- Cut bun slices and second rise: Using unscented floss or a sharp knife, cut the log into approximately 1-inch thick slices. Place the slices on wax paper, cover loosely with plastic wrap, and let them rise for an additional 30 minutes.
- Fry the buns: Heat the vegetable oil in a pan over medium-high heat. Fry the buns in batches for about 1½ to 2 minutes per side, or until golden brown. Drain on paper towels to remove excess oil.
- Prepare the glaze: While the buns are still warm, whisk together melted butter, sifted powdered sugar, honey, vanilla extract, and salt. Gradually stir in hot water until the glaze is thick but pourable.
- Glaze the buns: Dip each warm bun into the glaze, coating the tops and sides completely. Transfer to a cooling rack set over parchment paper and allow the glaze to set for about 20 minutes before serving.
Notes
- Make sure the milk is not too hot when mixing with yeast to avoid killing the yeast.
- You can use unsalted butter to better control salt levels.
- Shallow-frying the buns gives them a tender inside with a crisp golden exterior.
- If the glaze is too thick, add a bit more hot water a tablespoon at a time to reach desired consistency.
- Use unscented floss to ensure clean cuts without squashing the dough.
- Letting the dough rise properly is crucial for soft, airy buns.