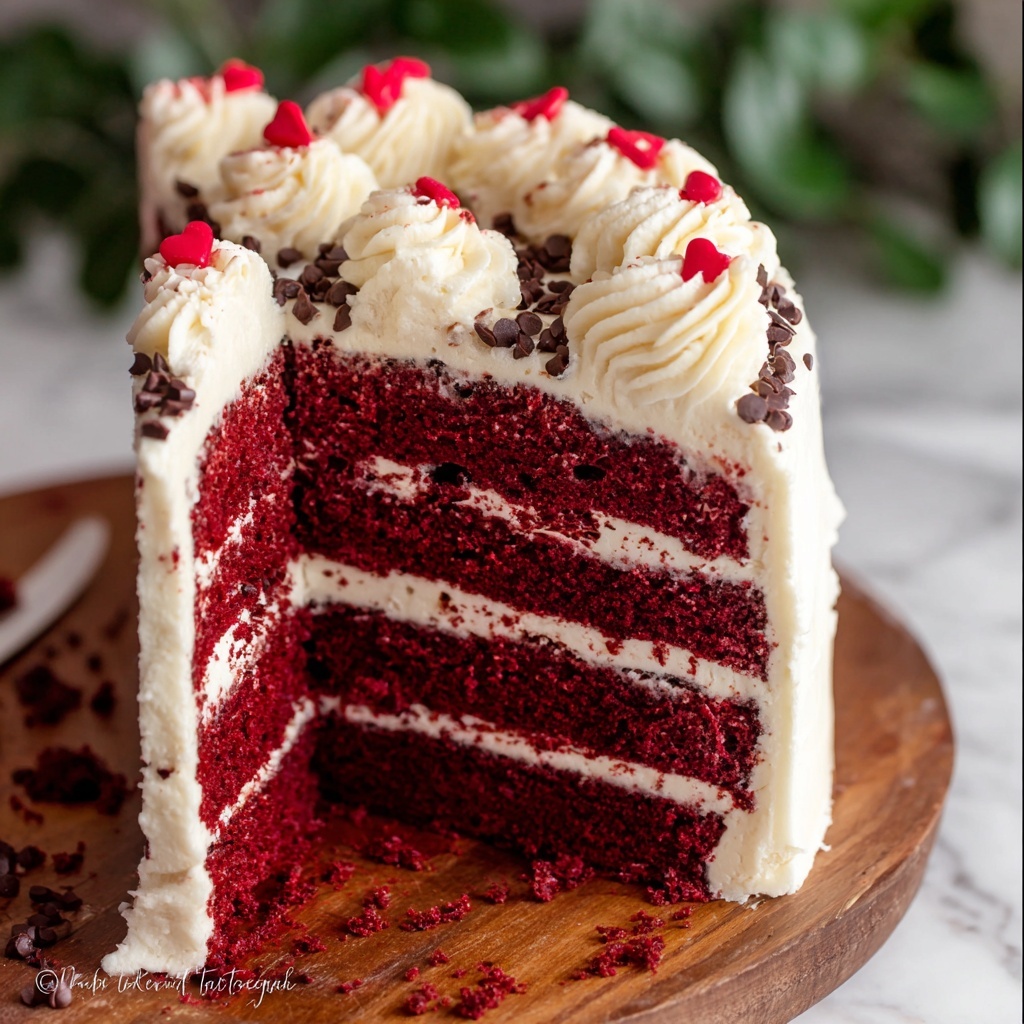
If you’ve been on the hunt for a dessert that blends the classic charm of red velvet with the irresistible burst of chocolate chips, look no further! This Red Velvet Chocolate Chip Cake Recipe is truly a celebration in every bite. Imagine moist, tender cake layers boasting that trademark red hue, speckled generously with melty mini chocolate chips and enveloped in a velvety cream cheese frosting that’s as smooth as silk. Whether you’re baking for a special occasion or simply craving something extraordinary, this cake rises to the occasion, bringing warmth, sweetness, and a delightful texture combination that will keep you coming back for more.
Ingredients You’ll Need
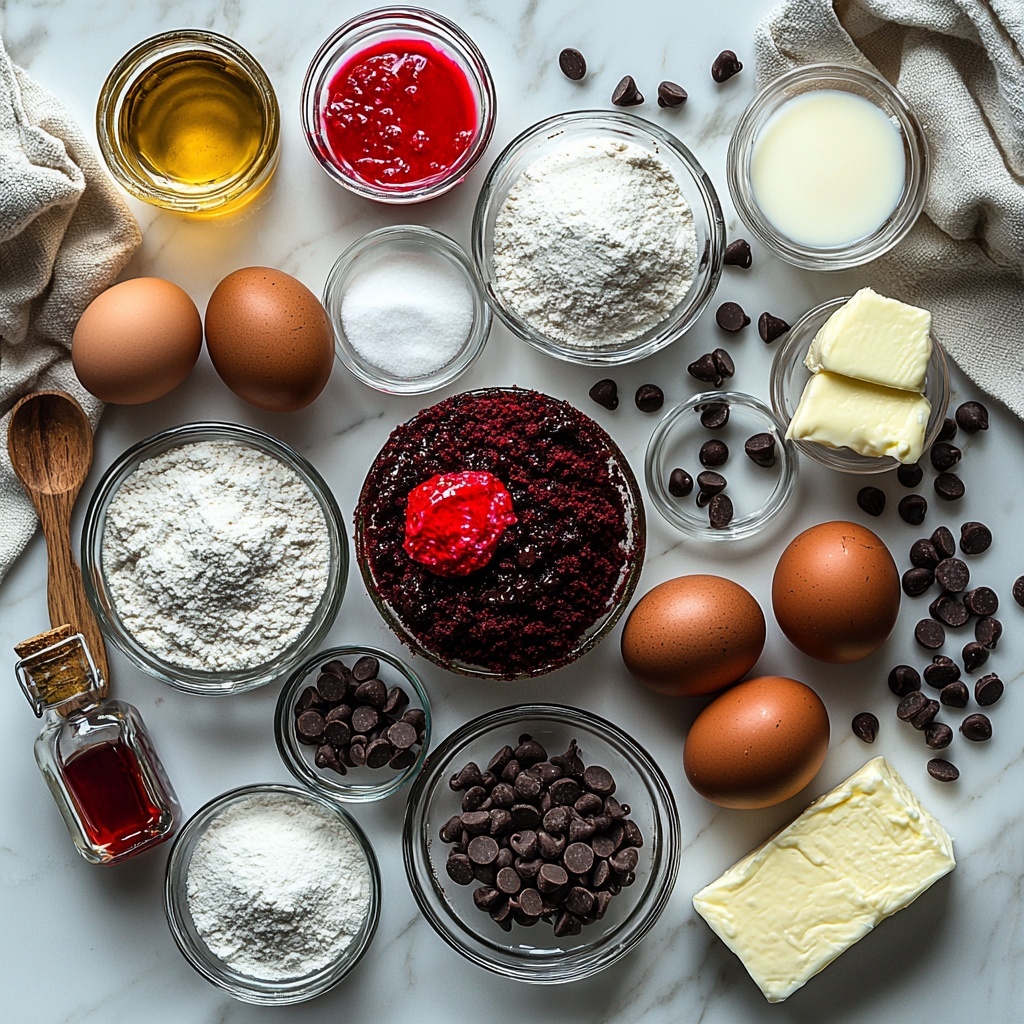
Before you roll up your sleeves, let’s talk about the magic behind this recipe — it’s all in the simple, yet carefully chosen ingredients. Each one plays a vital role in crafting a cake that’s moist, colorful, and packed with flavor. From the richness of butter to the tangy punch of cream cheese and buttermilk, and the subtle cocoa powder note that brings depth, these essentials come together beautifully.
- All-purpose flour: Provides the sturdy structure without being too dense for tender crumb.
- Unsweetened cocoa powder (Dutch process recommended): Adds subtle chocolaty depth and enhances the red color.
- Baking powder and baking soda: Your dynamic duo for perfect rise and fluffiness.
- Salt: Balances sweetness and enriches flavor.
- Oil (canola or vegetable): Keeps the cake moist and tender.
- Unsalted butter (room temperature): Adds richness and buttery flavor.
- White granulated sugar: Sweetens and helps create a fluffy texture when beaten with butter.
- Pure vanilla extract: Brings warm, aromatic notes to the batter and frosting.
- White vinegar: Reacts with baking soda to give lift and enhances the classic tang of red velvet.
- Sour cream or Greek yogurt (room temperature): Adds moisture and slight tang for depth.
- Large eggs (room temperature): Bind the ingredients and keep the cake tender.
- Red food gel dye: For that iconic, vibrant red that makes this cake unforgettable.
- Buttermilk (room temperature): Contributes tanginess and tenderness.
- Mini chocolate chips: Bursts of chocolate joy inside every slice.
- Cream cheese (room temperature): Essential for the signature frosting.
- Powdered sugar (sifted): Sweetens and smooths the frosting perfectly.
How to Make Red Velvet Chocolate Chip Cake Recipe
Step 1: Preparation & Sifting Dry Ingredients
To start, preheat your oven to 350℉. Spraying your cake pans with a nonstick spray and lining them with parchment paper will ensure your cake layers come out perfectly every time. In a medium bowl, sift together the flour, Dutch-process cocoa powder, baking powder, baking soda, and salt. This not only removes any lumps but also helps distribute the leavening agents evenly for a consistent rise.
Step 2: Creaming Butter, Oil, and Sugar
Using your stand mixer or handheld beaters, beat the unsalted butter, oil, and granulated sugar on high speed until the mixture looks very pale and fluffy, about two minutes. This stage incorporates air, which is the secret behind a light and tender crumb in your cake.
Step 3: Mixing in Wet Ingredients
Next up, add vanilla extract, white vinegar, sour cream, eggs, and that vivid red food dye. Blend on medium speed until everything is beautifully combined, making sure the batter has a luscious, vibrant hue without streaks.
Step 4: Combining Dry and Wet Ingredients
Slowly add your dry ingredients alternating with buttermilk, mixing on low speed just until everything is combined. Overmixing can lead to a denser cake, so once the textures come together, stop! Finally, fold in those precious mini chocolate chips gently with a spatula to ensure they are evenly spread without sinking.
Step 5: Baking the Cake Layers
Divide your batter evenly across the three prepared pans, smoothing the tops so they bake uniformly. Pop them into your preheated oven for 25 to 30 minutes or until a toothpick inserted into the center comes out clean. Letting the cakes rest in the pans for 10 minutes will help them release effortlessly when transferred to a cooling rack.
Step 6: Preparing the Cream Cheese Frosting
While the layers cool, sift your powdered sugar for a lump-free frosting. Beat the butter alone for two minutes until fluffy, then add the cream cheese and continue beating until smooth. Gradually add in the powdered sugar in two additions, mixing on low speed at first to avoid a sugar cloud, then increase speed until creamy. Finish by blending in vanilla extract for a rich, aromatic touch.
Step 7: Assembling and Decorating Your Cake
Set your first cake layer down on your serving board and spread a generous cup of frosting evenly on top. Sprinkle about one-third cup of mini chocolate chips over the frosting for an extra chocolatey delight. Repeat with the second layer. For the top layer, place it upside down to give a flat finish for frosting. Apply a thin crumb coat of frosting around the entire cake and freeze for 15 minutes to set. Then, finish frosting the cake and generously decorate with more mini chocolate chips for that irresistible final touch.
How to Serve Red Velvet Chocolate Chip Cake Recipe
Garnishes
To make your cake presentation truly pop, consider sprinkling extra mini chocolate chips on top or even adding a few fresh raspberries for a tart contrast. A light dusting of cocoa powder or edible glitter can elevate your cake for celebrations. The cream cheese frosting itself is so luscious that a simple swirl or piped rosettes give a charming finish.
Side Dishes
This cake pairs beautifully with a scoop of vanilla bean ice cream for a refreshing complement to its richness. A cup of freshly brewed coffee or a spiced chai latte also makes terrific companions, balancing the sweetness and enhancing the overall experience.
Creative Ways to Present
If you’re feeling adventurous, slice your Red Velvet Chocolate Chip Cake Recipe into petite mini cakes or cupcakes for easier sharing at parties. Wrapping individual portions in parchment with a bow can transform them into thoughtful gifts. Another fun idea is layering the cake in a trifle dish with extra chocolate chips and whipped cream for a no-fuss dessert showstopper.
Make Ahead and Storage
Storing Leftovers
Once decorated, store your cake covered in the refrigerator to keep the cream cheese frosting fresh. Make sure to use a cake dome or wrap tightly with plastic wrap to prevent it from absorbing any fridge odors. Leftovers typically stay delicious for up to 4-5 days.
Freezing
This cake freezes beautifully, making it a great option to prepare ahead. Wrap the whole cooled, unfrosted cake layers tightly in plastic wrap and then aluminum foil. Freeze for up to 3 months. When ready to use, thaw the layers in the fridge overnight, then assemble and frost as usual.
Reheating
Because it’s a cake best enjoyed cool or at room temperature, reheating isn’t typically needed. However, if you want to warm a slice slightly, pop it in the microwave for 10-15 seconds to soften the frosting and melt the chocolate chips just a bit. Enjoy warm with a spoonful of whipped cream for extra indulgence!
FAQs
Can I use regular cocoa powder instead of Dutch process?
Yes, you can, but Dutch process cocoa gives a smoother flavor and a richer red hue. Regular cocoa powder may result in a slightly different taste and color, but the cake will still be delicious.
What can I substitute for sour cream?
Greek yogurt is a perfect substitute for sour cream and will provide the same moisture and slight tanginess. Just ensure it’s at room temperature before mixing.
Can I make this cake gluten-free?
To make this cake gluten-free, use a 1-to-1 gluten-free flour blend that contains xanthan gum. Baking times might vary slightly, so keep an eye on the texture and done-ness.
Why do we add vinegar in red velvet cake?
Vinegar reacts with the baking soda to produce carbon dioxide, which helps the cake rise. It also enhances the tangy flavor that is signature to red velvet cakes.
How do I prevent the chocolate chips from sinking?
Folding the mini chocolate chips into the batter gently at the end and ensuring the batter isn’t too thin helps keep them suspended during baking. Using mini chips instead of larger chunks also prevents sinking.
Final Thoughts
I cannot recommend this Red Velvet Chocolate Chip Cake Recipe enough if you’re ready to wow your friends or simply treat yourself to a supremely satisfying dessert. With its perfect combination of moist red velvet layers studded with chocolate chips and topped with dreamy cream cheese frosting, it’s a slice of pure joy in cake form. Trust me, once you make it, this cake will become a beloved staple in your kitchen and the star of any gathering. Go ahead and bake yourself happy!
Print
Red Velvet Chocolate Chip Cake Recipe
- Prep Time: 25 minutes
- Cook Time: 30 minutes
- Total Time: 2 hours 25 minutes
- Yield: 16 servings
- Category: Dessert
- Method: Baking
- Cuisine: American
Description
A rich and moist Red Velvet Chocolate Chip Cake layered with creamy cream cheese frosting and mini chocolate chips, perfect for celebrations or any special occasion. This recipe combines the classic red velvet flavor with bursts of chocolate chips in every bite, topped with a smooth and luscious cream cheese frosting.
Ingredients
Dry Ingredients
- 3 1/2 cups All-purpose flour
- 1/4 cup Unsweetened cocoa powder (Dutch process)
- 2 tsp Baking powder
- 1/2 tsp Baking soda
- 1 tsp Salt
Wet Ingredients
- 1/2 cup Oil (canola or vegetable)
- 1/2 cup Unsalted butter (room temperature)
- 1 3/4 cup White granulated sugar
- 1 tsp Pure vanilla extract
- 1 tsp White vinegar
- 1/3 cup Sour cream (room temperature or Greek yogurt)
- 4 Large eggs (room temperature)
- 1 tsp Red food gel dye (Americolor super red)
- 1 cup Buttermilk (room temperature)
Add-ins
- 1 1/2 cups Mini chocolate chips
Cream Cheese Frosting
- 2 cups Unsalted butter (room temperature)
- 8 oz Cream cheese (room temperature)
- 5 cups Powdered sugar (sifted)
- 1 tsp Pure vanilla extract
- 1/2 cup Mini chocolate chips (for filling and topping)
Instructions
- Preheat and Prepare Pans: Preheat the oven to 350℉. Spray three 8-inch cake pans with nonstick baking spray, line the bottoms with parchment paper, and spray again to ensure easy cake removal.
- Sift Dry Ingredients: In a medium bowl, sift together flour, cocoa powder, baking powder, baking soda, and salt. Set aside for later use.
- Cream Butter, Oil, and Sugar: Using a mixer with a large bowl, beat the butter, oil, and sugar on high speed for 2 minutes until the mixture is pale and fluffy, indicating proper aeration.
- Add Wet Ingredients: Mix in vanilla extract, white vinegar, sour cream, eggs, and red food dye on medium speed until the batter is combined evenly.
- Combine Dry and Wet Ingredients: Gradually add the sifted dry ingredients and buttermilk to the wet mixture, mixing on low speed until just combined to avoid overmixing. Remove the bowl from the mixer and fold in mini chocolate chips carefully with a spatula.
- Divide and Bake: Evenly distribute the batter among the three prepared cake pans and smooth the tops. Bake in the preheated oven for 25-30 minutes, or until a toothpick inserted into the center comes out clean.
- Cool Cakes: Allow the cakes to sit in the pans for 10 minutes after baking, then transfer them to a cooling rack to cool completely before frosting.
- Prepare Frosting – Sift Sugar: Sift the powdered sugar in a large bowl; set aside.
- Beat Butter and Cream Cheese: In a separate bowl, beat the butter on high speed for 2 minutes. Scrape down the bowl, add cream cheese, and beat on high for 1 minute until smooth. Continue beating if any lumps remain.
- Mix in Powdered Sugar and Vanilla: Add half of the powdered sugar and mix on low until nearly combined. Then add the remaining powdered sugar and mix on low. Add vanilla extract and beat on high speed until the frosting is creamy and smooth.
- Assemble Cake Layers: Place a small dollop of frosting on your work surface to anchor the first cake layer. Position the first cake layer right side up.
- Fill: Spread 1 cup of frosting over the first cake layer, then sprinkle 1/3 cup of mini chocolate chips over the frosting.
- Repeat Layers: Add the second cake layer on top and repeat the frosting and chocolate chip layering. For the third layer, invert the cake so the bottom is facing up.
- Chill Briefly: Apply a thin crumb coat of frosting over the entire cake to seal in crumbs, then freeze the cake for 15 minutes to set the frosting.
- Final Frosting and Decoration: Frost the cake completely with the remaining frosting and decorate the top with mini chocolate chips for a finishing touch.
Notes
- Room temperature ingredients help in better mixing and achieving a smooth batter and frosting.
- Use Dutch process cocoa powder for a deeper red color and richer chocolate flavor.
- The white vinegar enhances the red color and tenderizes the cake.
- Chilling the cake after the crumb coat helps to achieve a clean, professional-looking finish.
- Be careful not to overmix the batter once dry ingredients are added to keep the cake tender.
- For best results, use high-quality cream cheese and butter for the frosting.


